The Greenlight Approval Flow manual
Everything you need to run approval workflows on monday.com — from your first request to conditional routing rules and the cross-account approver portal. Every feature is shown with a real screenshot of the shipped product.
1 · Getting started
Install it, get a board, then decide how approvals should start. There are two standard ways to run them — and most teams end up using both.
- Open our install link and click Install. The marketplace listing is still in review, so this link is the way in for now.
- On first use monday asks you to authorize the app. This lets Greenlight read and write your boards (approvers, items, the decision columns), read user names and emails, post audit updates, open attachments, and register board webhooks so unauthorized edits can be reverted.
- Get yourself a board to approve things on (see below).
- Turn on the automation (§2), send a request from an item (§3), or set up both.
Two ways to run approvals
They answer different questions. The automation handles approvals that should happen every time your process reaches a certain point. The Request button handles a person asking for something specific and explaining why.
| The automation (§2) | The Request button (§3) | |
|---|---|---|
| What starts it | Your process — an item's status changes to Pending and the request goes out by itself | A person — they open the item and ask |
| Best for | Approvals that must happen every time, where nobody should have to remember | One-off asks that need explaining: “here's the invoice, here's why, here's the deadline” |
| Carries a message & attachment | No — a status flip has no author and no context to carry | Yes — a required message and an optional file |
| Writes back Approval / Approved By / Approved At | Yes — to the columns Greenlight finds on the board (§16) | Yes — same columns, same way (§16) |
| Setup | Once per board, about two minutes | None — it works the moment you install |
Getting a board — three ways
| Option | What you get |
|---|---|
| Install the ready-made board template Approvals board template ↗ | A board with Approver, Approval, Approved By, Approved At, Amount and Attachments columns already in place. Fastest way to see everything working, including routing rules on the Amount column. |
| Click “Create approvals board” in the Get started checklist (below), or “Create my approvals board” in the portal's Onboarding or Settings tab | Greenlight makes a board called Approvals for you with the same columns. Requires a monday account admin, and it's idempotent — if you already have one, it just points you at it. |
| Use a board you already have | Perfectly fine. Approvals work on any Work Management board. You only need extra columns if you want decisions written back to columns (§16) or want rules to read a value like Amount (§8). |
The Get started checklist
The app's starting point in monday is the My Approval Queue board view (§11). At the top sits Get started with Greenlight Approval Flow, a short checklist that ticks itself off as you go:
- Connect Greenlight Approval Flow — authorize the app.
- Create your approvals board — one click on Create approvals board. Admins only; everyone else can use a board they already have.
- Request your first approval — from the item menu or the Approval Panel (§3).
- Approve it — from the email, or from your queue right under the checklist.
- Set up rules and automation — marked optional: routing rules (§8) and the automation (§2).
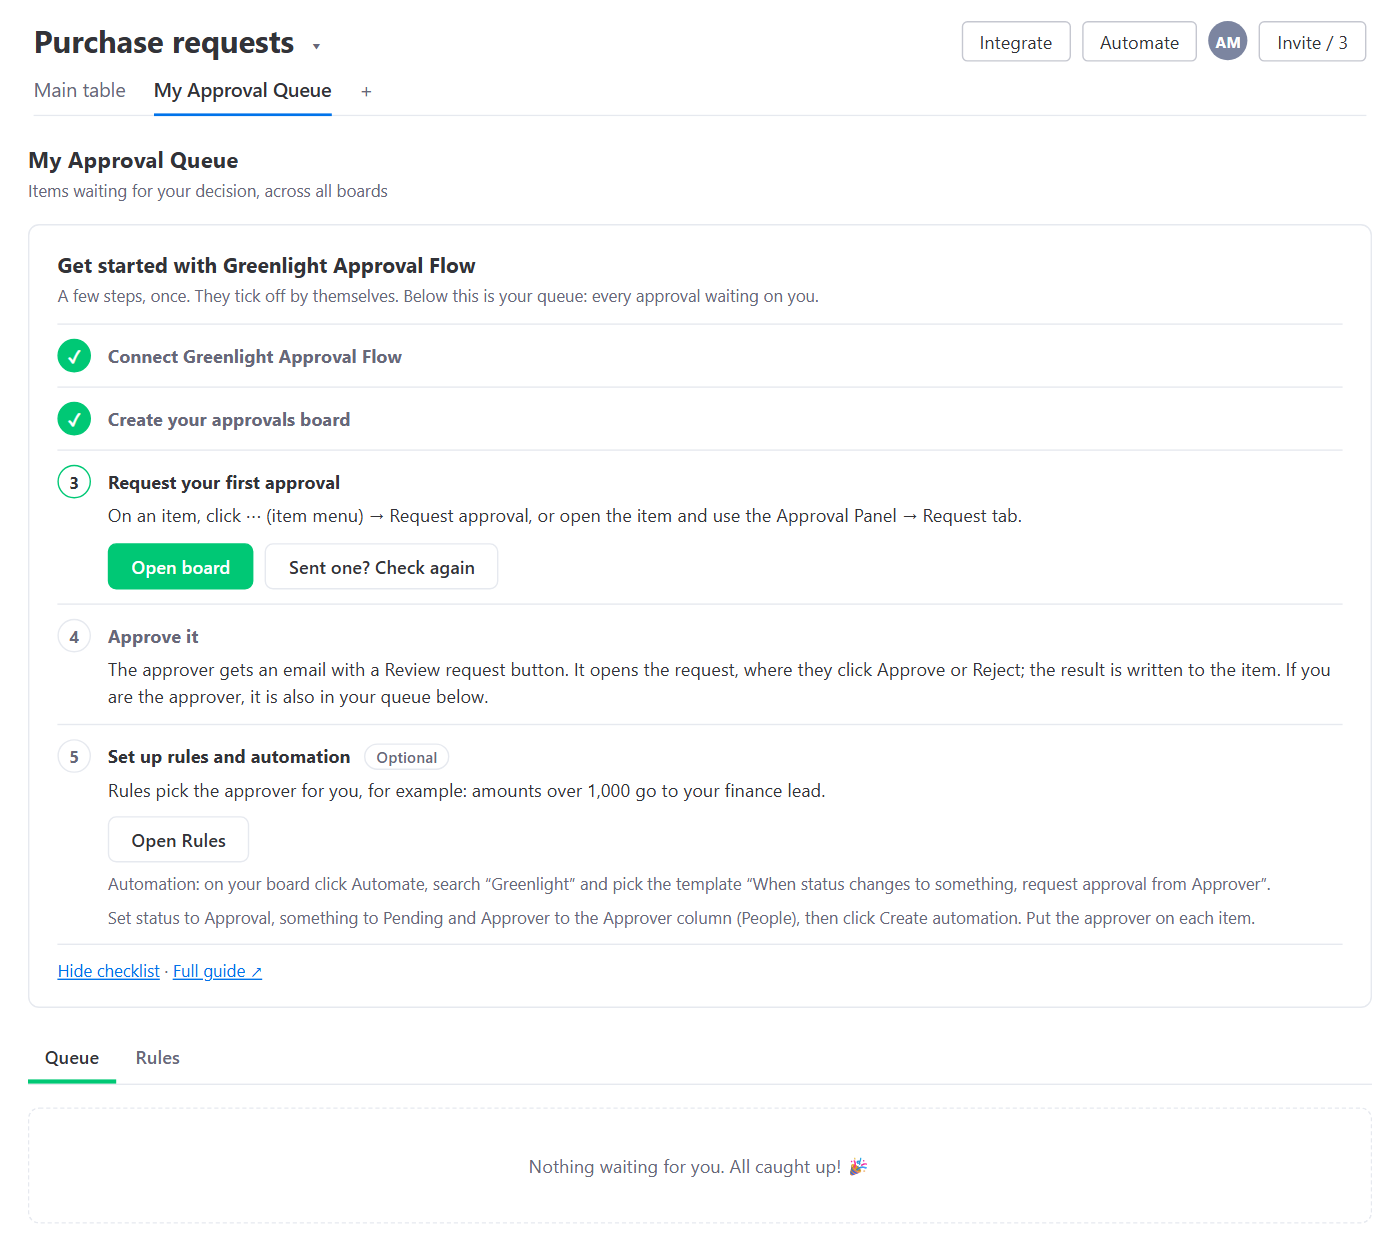
Under the steps: Hide checklist and Full guide ↗ (this page). Once hidden, a Getting started link brings it back. Hiding is account-wide and also removes the portal's Onboarding tab, which has the same steps (§9).
2 · The approval automation
Approvals that fire from your process. An item's status changes to Pending, the request goes out by itself, and nobody has to remember. This is what most teams set up.
- On your board, click Automate and search Greenlight.
- Pick the template “When status changes to something, request approval from Approver”.
- Set status to Approval, something to Pending, and Approver to the Approver column (People). The item comes from the trigger by itself. Put the approver on each item.
- Click Create automation. Every item that hits Pending now starts an approval chain, and decisions are written back to your Approval, Approved By and Approved At columns by themselves.
Add it once per board and the approval step stops depending on anyone noticing. It's the right choice whenever the approval is part of how the work moves — a purchase request reaching Pending, a contract reaching Ready for review, a design reaching Needs sign-off.
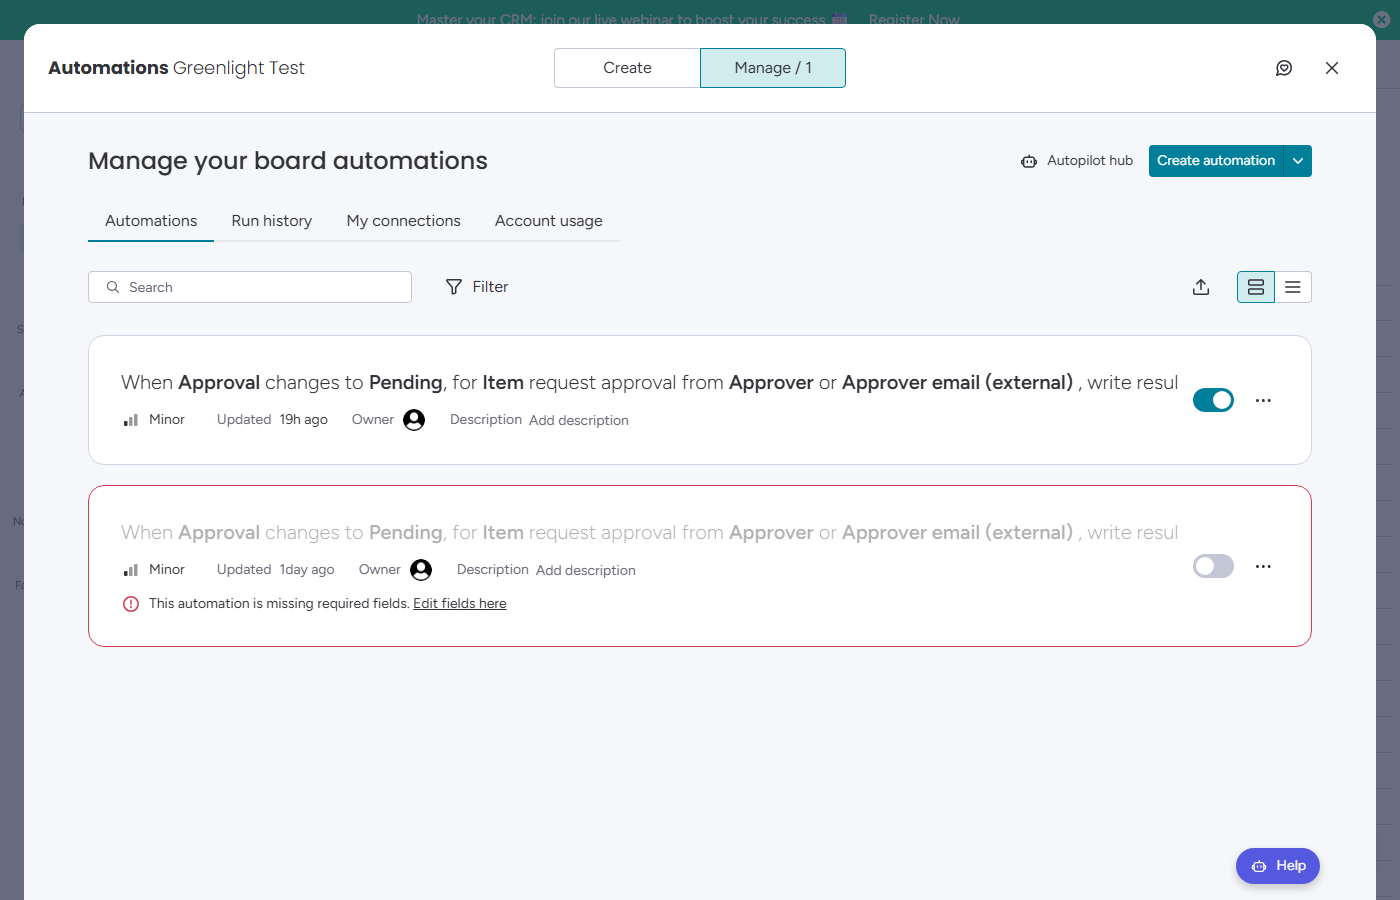
If the item already has a request waiting, the automation skips it: it never starts a second chain on the same item. (A person using the Request button can, on purpose — §3.)
Pending and clears Approved By and Approved At, so an old “Approved” never sticks around. While the request is waiting, a manual change to any of these three columns is reverted within seconds, and an update on the item says who the request is waiting for: only they can approve or reject it. The values sent with the request, like the amount, are frozen the same way until it's decided (§3). This is automatic, no setup needed.3 · The Request button
For when a person needs to ask for something specific and explain why. Open the item, write what you need, attach the invoice, send. A status flip can't carry any of that — it has no author and no context — which is why this path exists alongside the automation, not instead of it.
It also happens to need no setup at all, so it's the fastest way to try the product on the day you install it.
Where to find it
- Open any item → the Approval Panel item view → the Request tab. First time on a board: click + in the item card's tab row → Explore more views → Installed Apps → add Approval Panel.
- Or use the Request approval entry in a board item's menu, which opens the same dialog.

The message — required
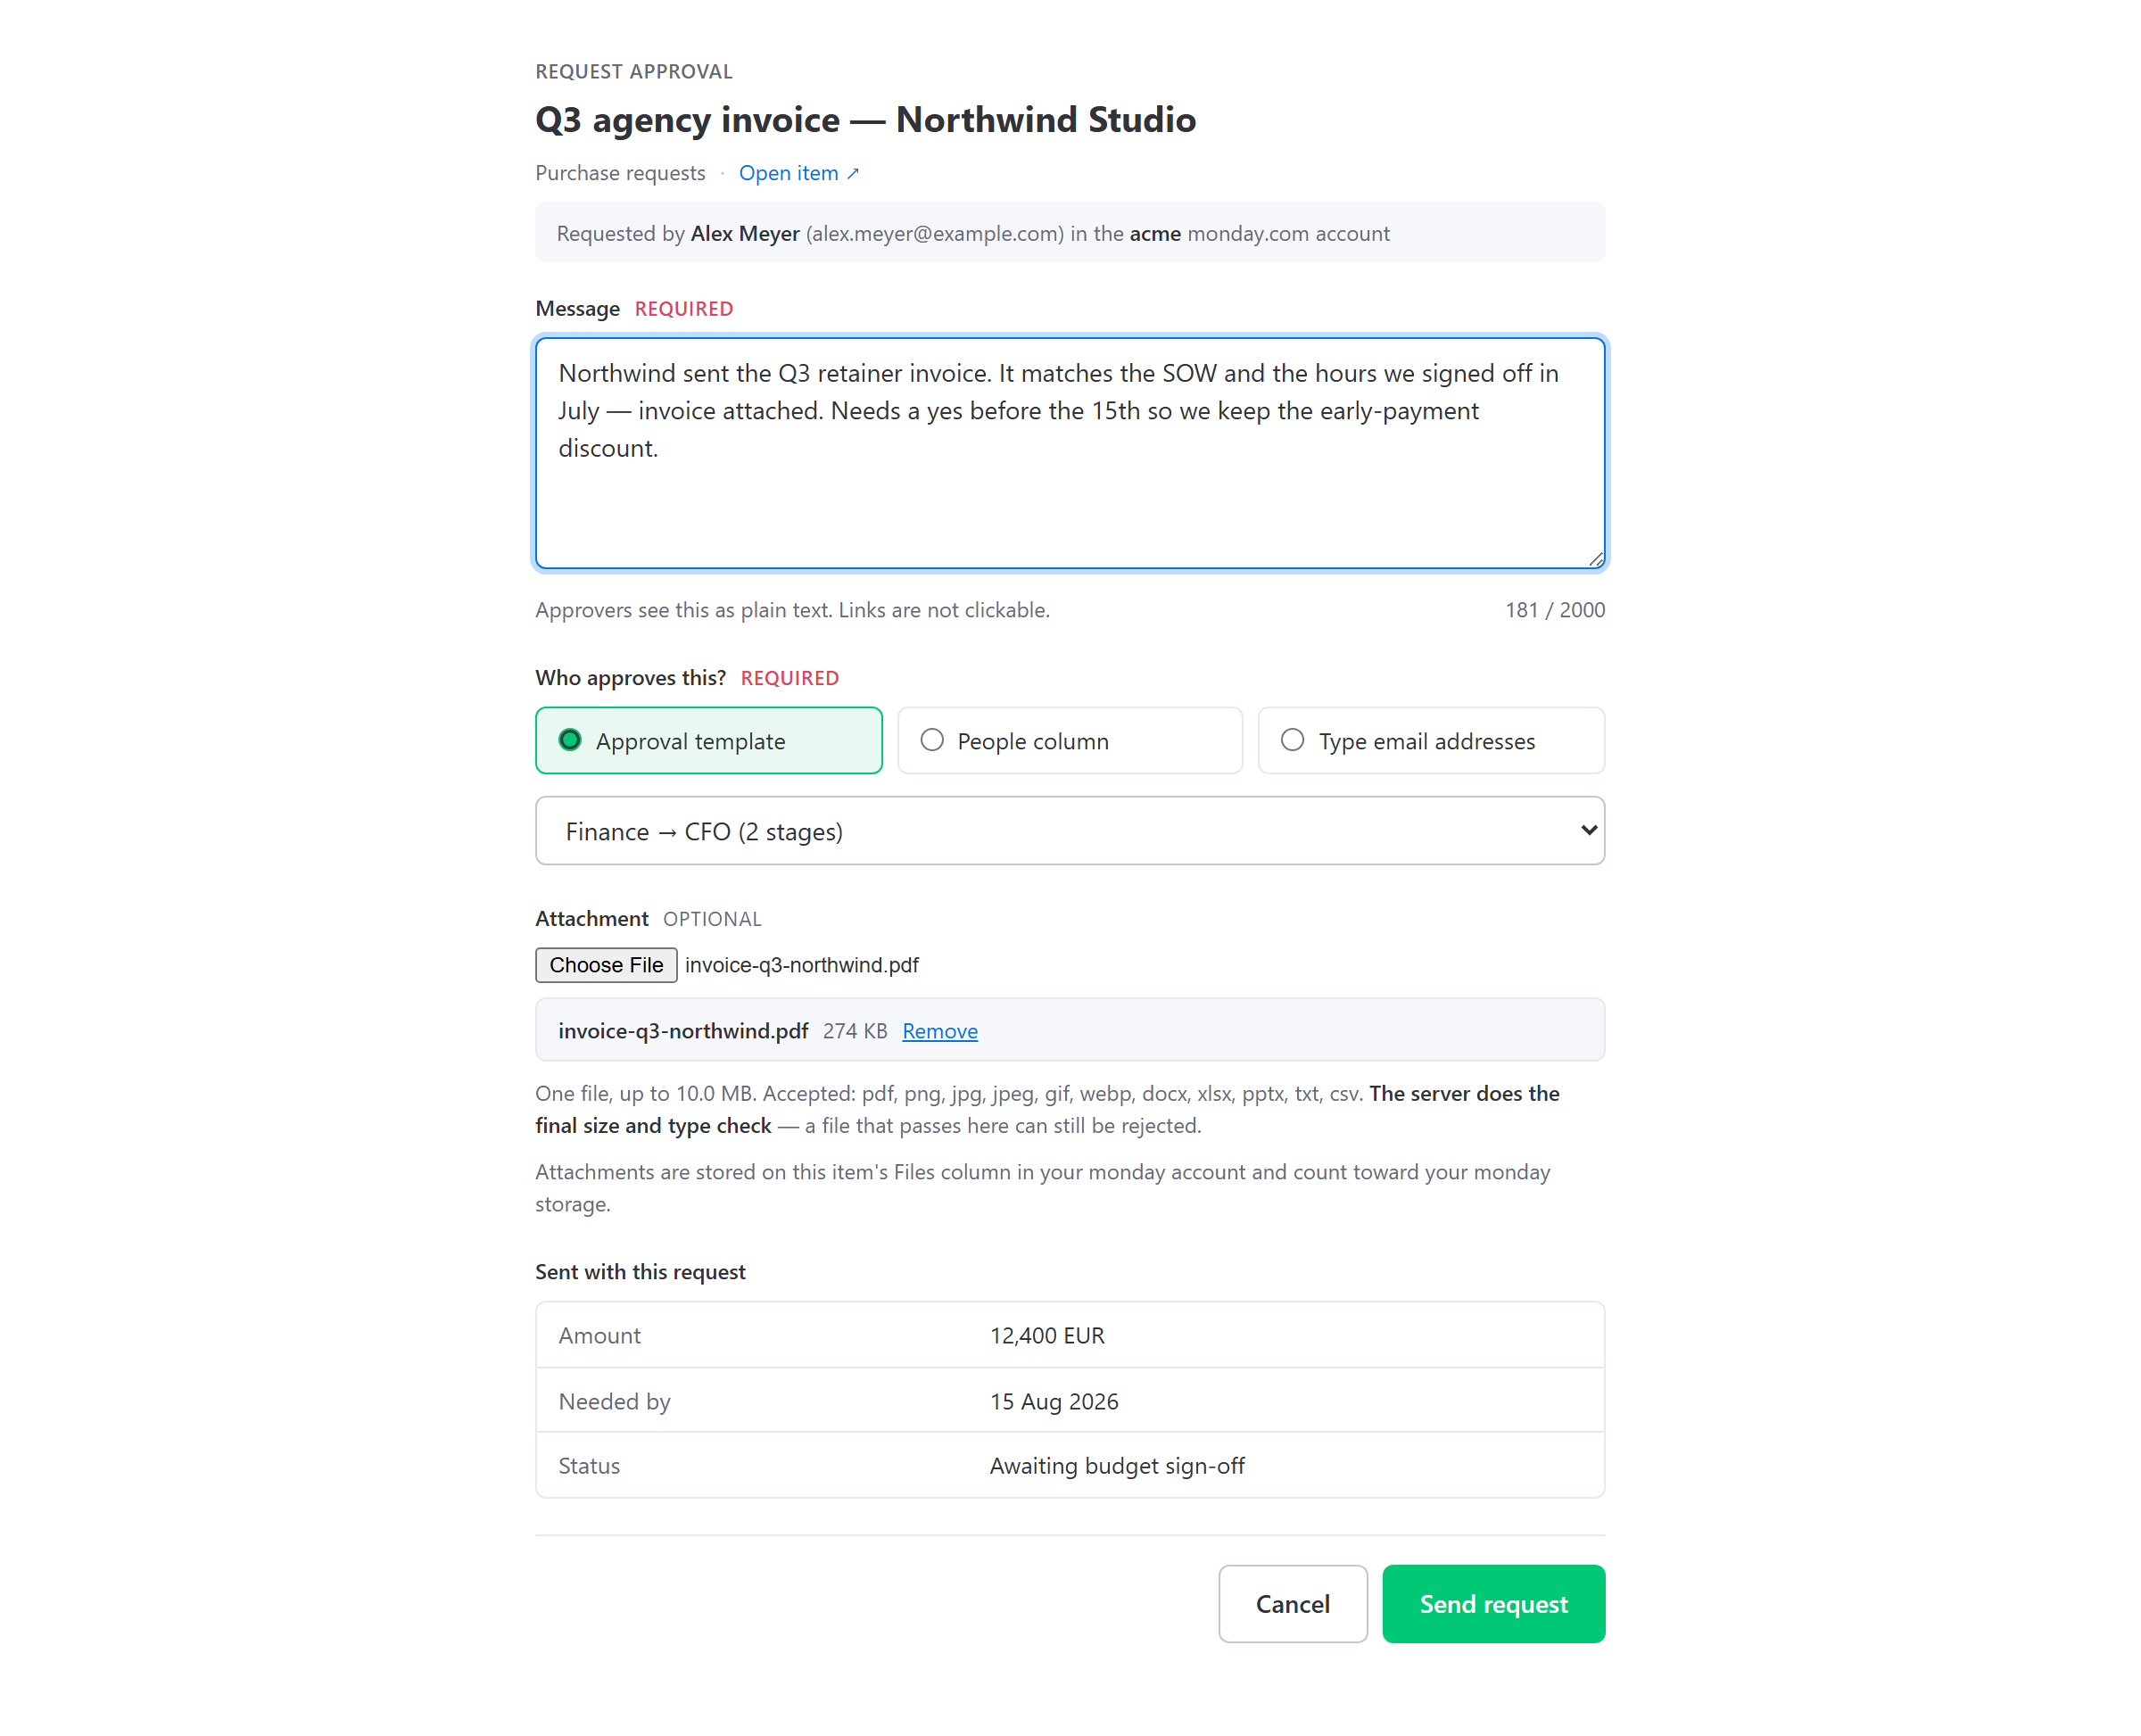
Every request needs a message, between 1 and 2,000 characters. That is deliberate: an approver who gets a bare “please approve” has to go dig for context, and that's where days disappear. The dialog tells you what the approver will see: “Approvers see this as plain text. Links are not clickable.” — URLs in your message are never turned into clickable links, which is what stops the request email being used as a phishing vehicle.
The attachment — optional
- One file per request, up to 10 MB.
- Accepted types:
pdf,png,jpg,jpeg,gif,webp,docx,xlsx,pptx,txt,csv. Legacy.doc/.xls/.pptand archives such as.zipare rejected on purpose. - The file is stored on the item's own Files column, in your monday account — it counts toward your monday storage, not ours. If the board has more than one Files column you pick which; if it has none, the dialog offers a Create a Files column button.
- The upload is never allowed to sink the request. If monday rejects the file, the approval still goes out and you're told the file didn't make it.
The amount — optional
If the board has a Numbers column, the dialog shows one input for the first one (e.g. Amount), filled with the item's current value. Change it and the new value is written to the item before routing, so a rule on that column applies to this very request.
Context columns — chosen for you
Under Sent with this request the dialog shows what the approver will see alongside your message. You don't pick these and there is no checkbox to hide one — Greenlight takes the item's first 8 columns that actually have a value, in the board's own column order, and sends those.
Column types that can't produce a useful line are skipped automatically: files, subtasks, buttons, docs, progress, dependencies, mirror columns, formula columns, and the created/last-updated stamps.
Frozen while the request waits. The approver decides on these values, so they can't change under them. Edit one of these columns while the request is pending and Greenlight puts the sent value back, with the update “This request is waiting for approval. To change it, cancel and send a new request.” Changes made by monday automations while the request waits are put back too, so set such columns before sending. The freeze ends when the request is approved (the row lock takes over, §14), rejected or cancelled.
Who approves it
| Mode | Use it when |
|---|---|
| Approval template | You have a saved approver chain, e.g. “Finance → CFO”. Offered only if your account has templates (§12). |
| People column | The right approver is already assigned on the item. Offered only if the board has a People column. |
| Type email addresses | Anyone, including people who have never heard of monday. Comma-separated, in approval order, up to 5. |
When a rule decides instead of you
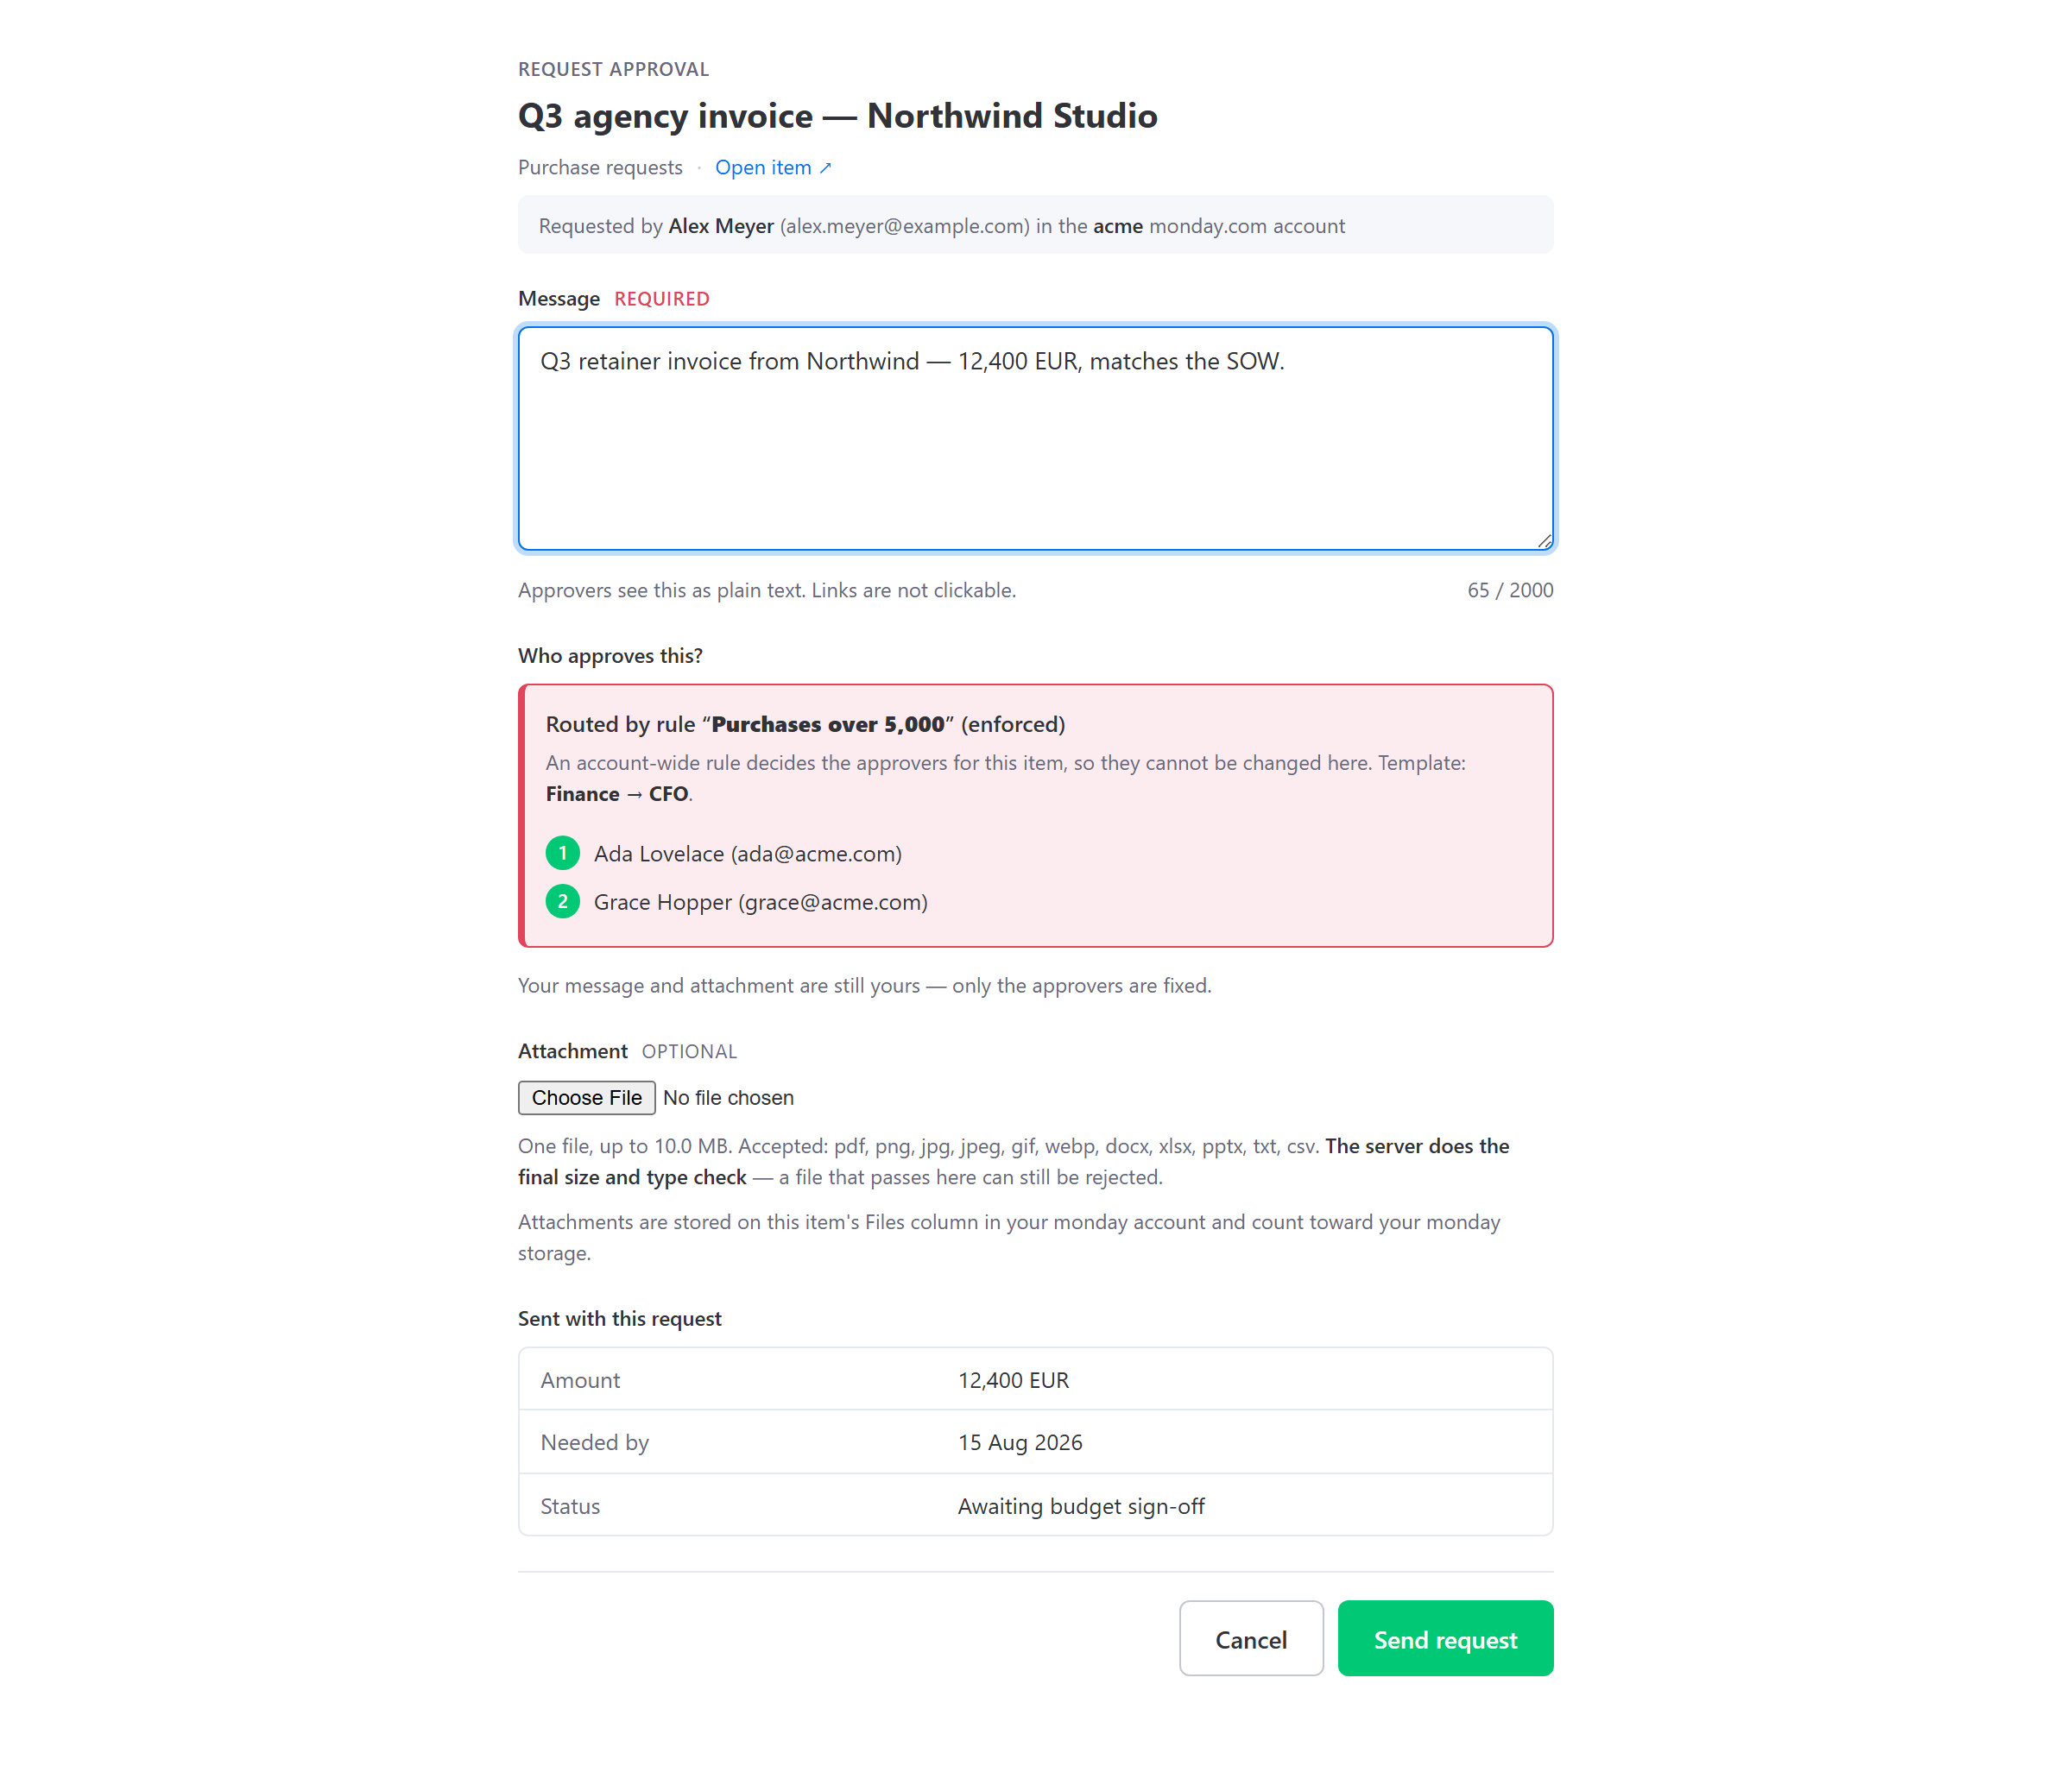
If a routing rule matches the item, the dialog says so. There are two flavours (§8 explains how to write them):
- Advisory — a banner reading “Rule ‘…’ suggests this chain — your choice below overrides it.” The picker stays fully editable and is pre-filled with the rule's template.
- Enforced — the picker is replaced by a read-only panel naming the rule and listing every approver in order. You cannot change it, and the server re-checks on send, so there is no way around it from the dialog.
4 · What the approver gets
A clean email with one neutral Review request button — the approve/reject choice is always made on the decision page, with the full request in view, never blind from the inbox. It works for monday users and for people outside your company entirely — a client, a supplier, your accountant. Their decision is written straight back to your board.
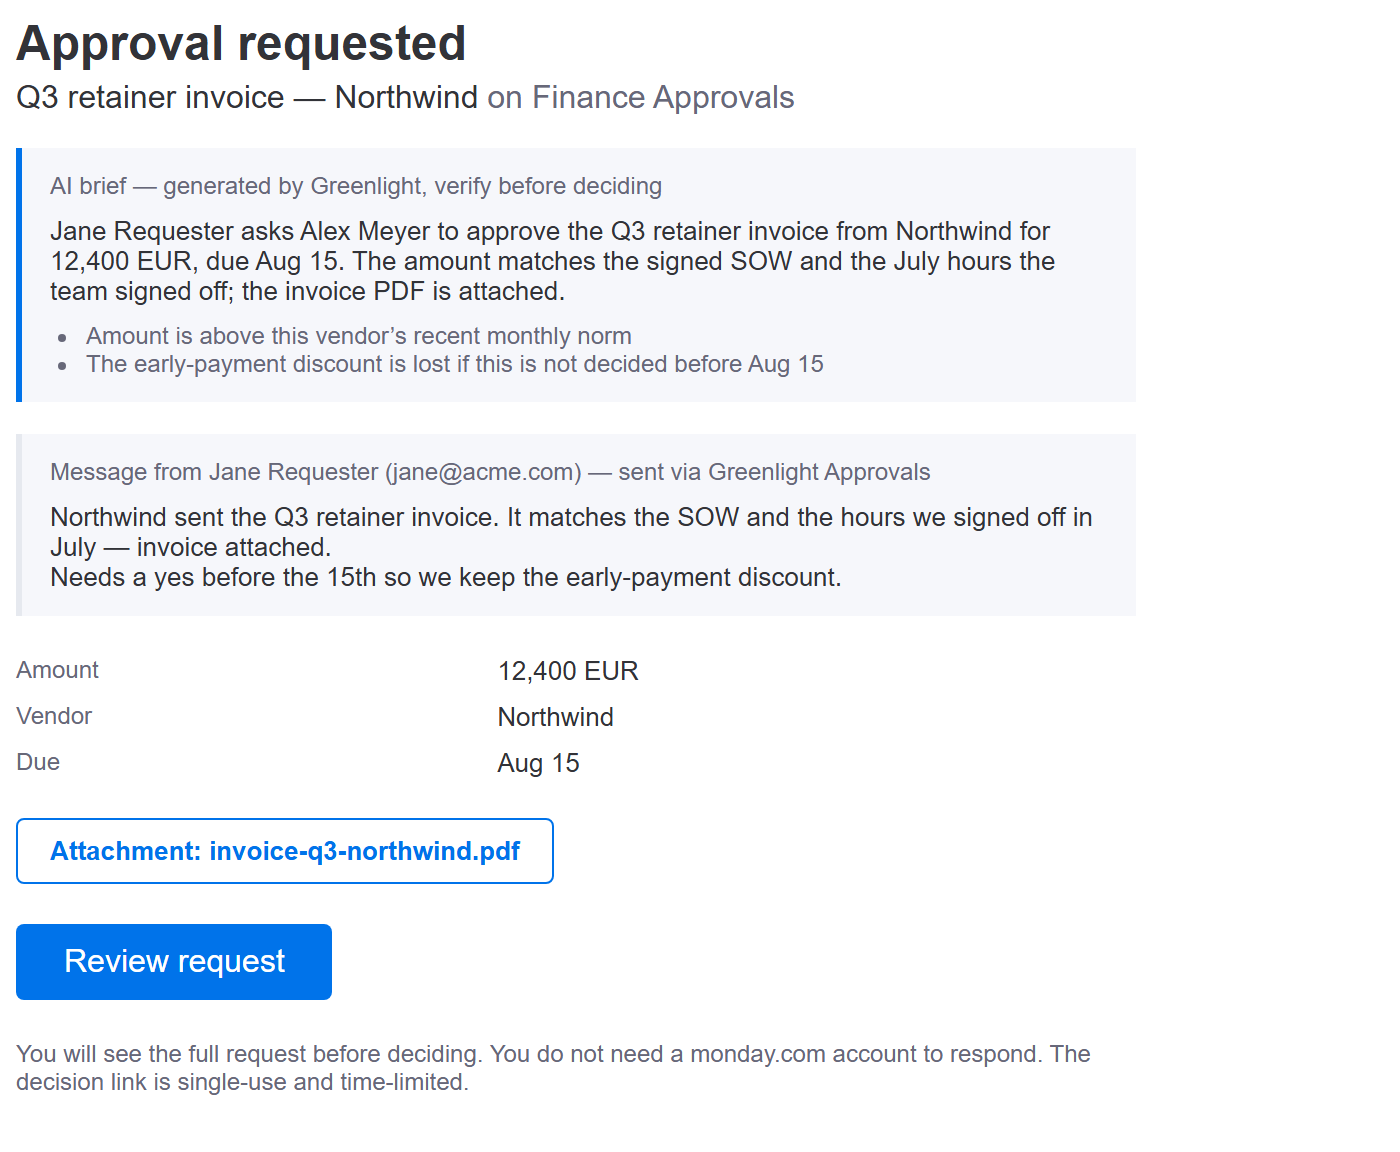
- Subject:
Approval requested: <item name>. - The AI brief sits at the top — two or three plain-English sentences plus up to three anomaly flags. The next subsection covers what it reads and why you should still read the request yourself.
- Your message appears with an attribution line saying who sent it — approvers always know whose request they're answering.
- The context columns render as a small table underneath.
- The attachment is a button: Attachment: <filename>. Each approver gets their own signed link, and it expires with the decision link.
- If a rule routed the request, the email says so — e.g. “Routed by the enforced account rule ‘Purchases over 5,000’ → Finance → CFO”.
- The Review request button opens the decision page. The link is cryptographically signed, the decision is single-use (first click wins), and it expires after 7 days.
The AI brief — and why you should still read the request
Every request also carries a short AI brief: two or three plain-English sentences covering what's being asked, by whom, and the key facts. It's generated once, when the chain is created — chains started before the feature existed simply don't have one — and it appears at the top of the request email above, on the decision page (§5), and in the portal's Inbox and Queue expanders (§9). Where it helps, the brief adds up to three anomaly flags — e.g. that the amount is unusual for this item's history, or that the request looks like a near-duplicate of an earlier one.
The brief reads the same context columns you see, the requester's message, and the text of the attachment — which is how the approver learns “the attached quote totals €14,200 excl. VAT” without opening the file. Text is extracted from pdf, docx, xlsx, pptx, txt and csv attachments. There is no OCR, so images (png, jpg and friends) are not read.
Getting the attachment
Attachment links are per-recipient and entitlement-checked: the current approver, anyone who has already decided, and the requester can open the file. An approver two stages down the chain cannot — not until their stage opens. After the chain is decided or cancelled, existing links keep working for a short grace period and then stop. Files are always served as a download, never rendered in the browser.
The completion email
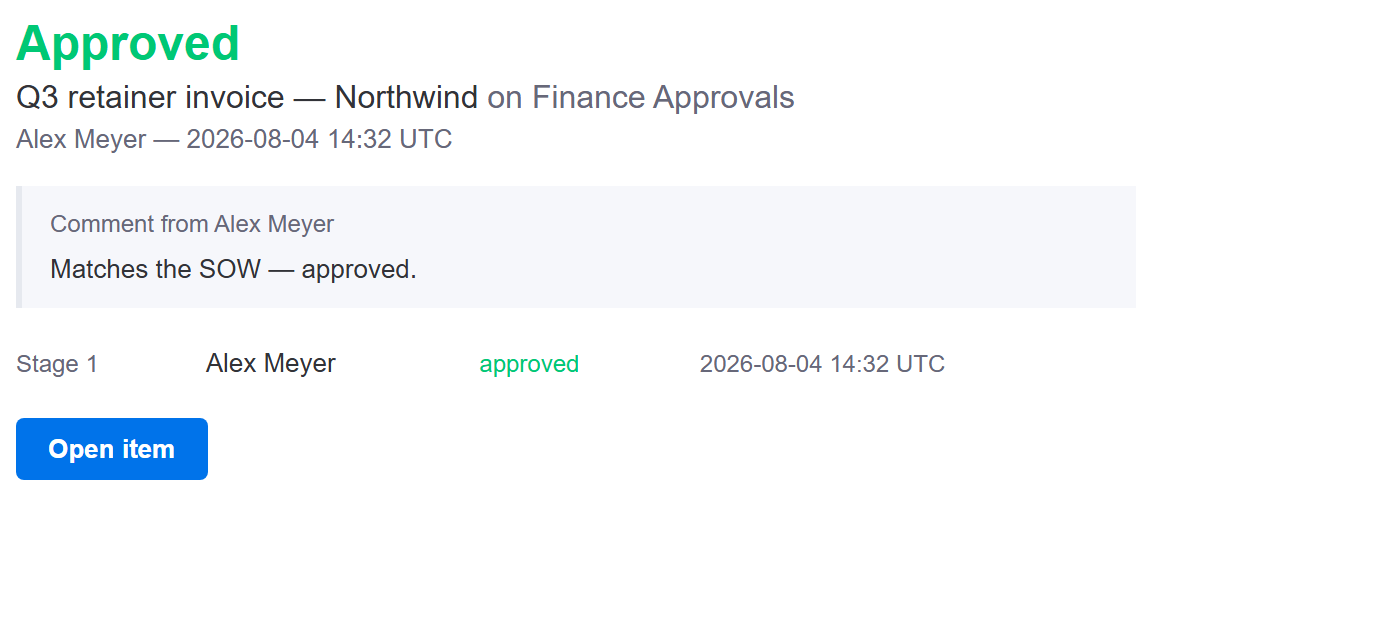
When the chain reaches its end — final approval, or a rejection at any stage — the requester gets an email telling them how it went. Subject: Approved: <item name> or Rejected: <item name>. It's sent once, and only for requests raised through the request dialog.
5 · The decision page & feedback comments
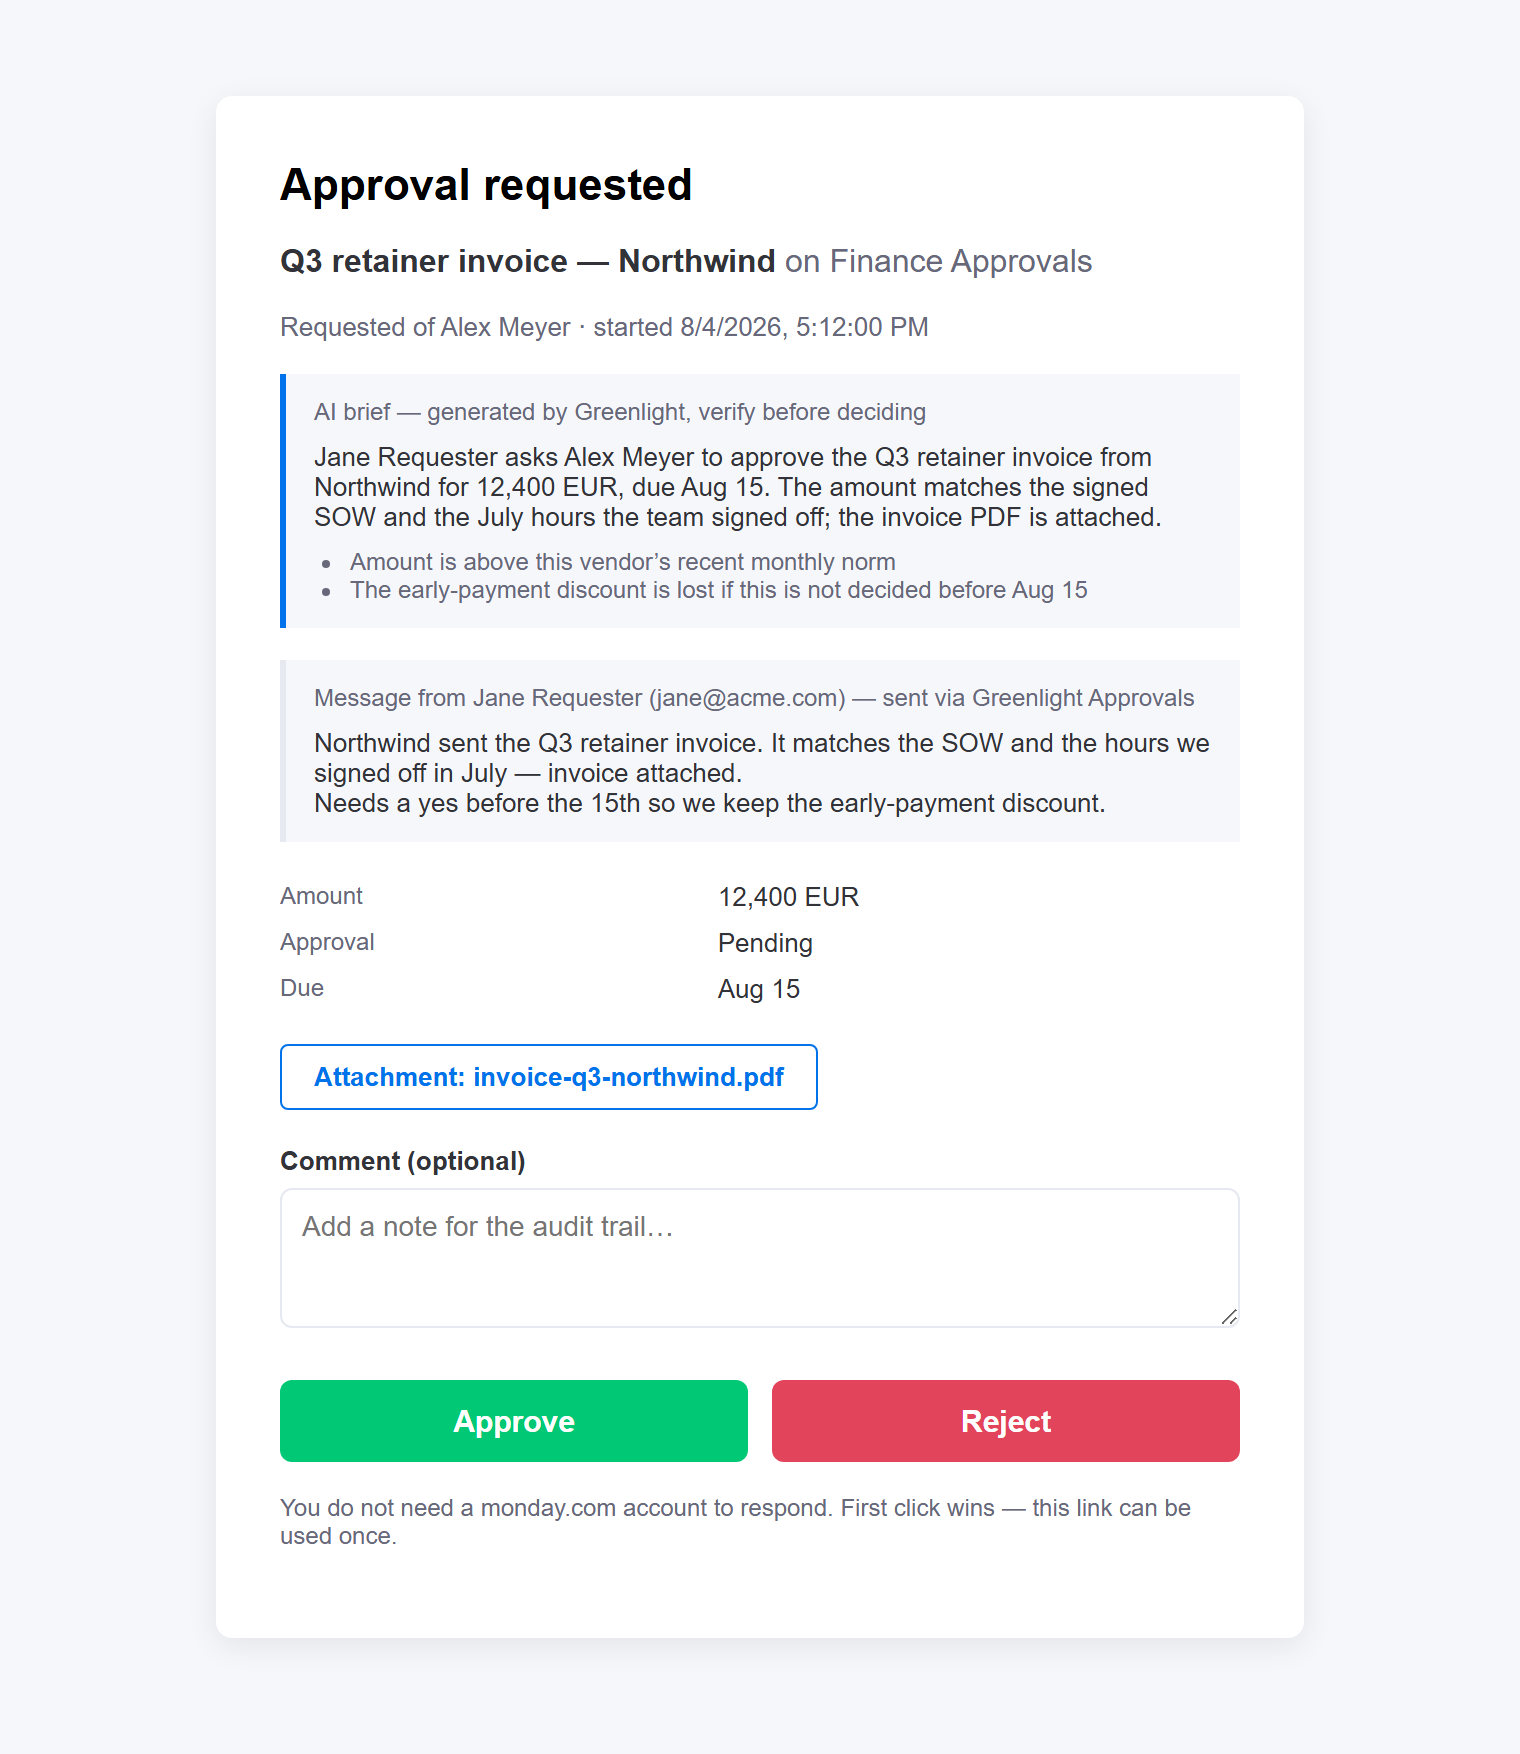
The Review request link opens a small page — no login required. It shows the full request, and approvers can leave an optional comment that becomes part of the audit trail.
- The page shows the whole request: item and board, who asked, the AI brief, their message, the context columns and the attachment.
- Type a comment (optional, up to 4,000 characters) — perfect for reject reasons or conditions.
- Click Approve or Reject. The board updates within seconds.
6 · Deciding without the email
The email link is for people who don't live in monday. If you do, there are three faster routes — all of them landing on exactly the same decision path, with the same audit entry.
| Where | Good for |
|---|---|
| My Approval Queue board view (§11) | Your own team, inside monday. Everything waiting on you across all boards in this account. Review on a row opens the decision page, where you approve or reject. |
| The portal's Queue or Inbox (§9) | Deciding from a browser or phone without opening monday at all — and, via the Inbox, deciding for several monday accounts from one page. |
| The email link (§4) | Outside partners, and anyone who'd rather just answer the email. |
7 · Sequential chains
Need manager → finance → exec? Put multiple people in the approver field — Greenlight runs them as stages, in order, fully automatically.
- Stage 1's approver gets the decision email immediately.
- When they approve, stage 2's approver is notified automatically. No one is spammed early.
- When the last stage approves, the chain completes and the audit trail closes out.
- A rejection at any stage stops the chain immediately and marks the item rejected.
Each stage is one approver, so a chain is simply an ordered list of people — e.g. “Manager first, then Finance”. Each approver gets their own signed link when their stage opens. There are no parallel or group-vote stages.
8 · Routing rules
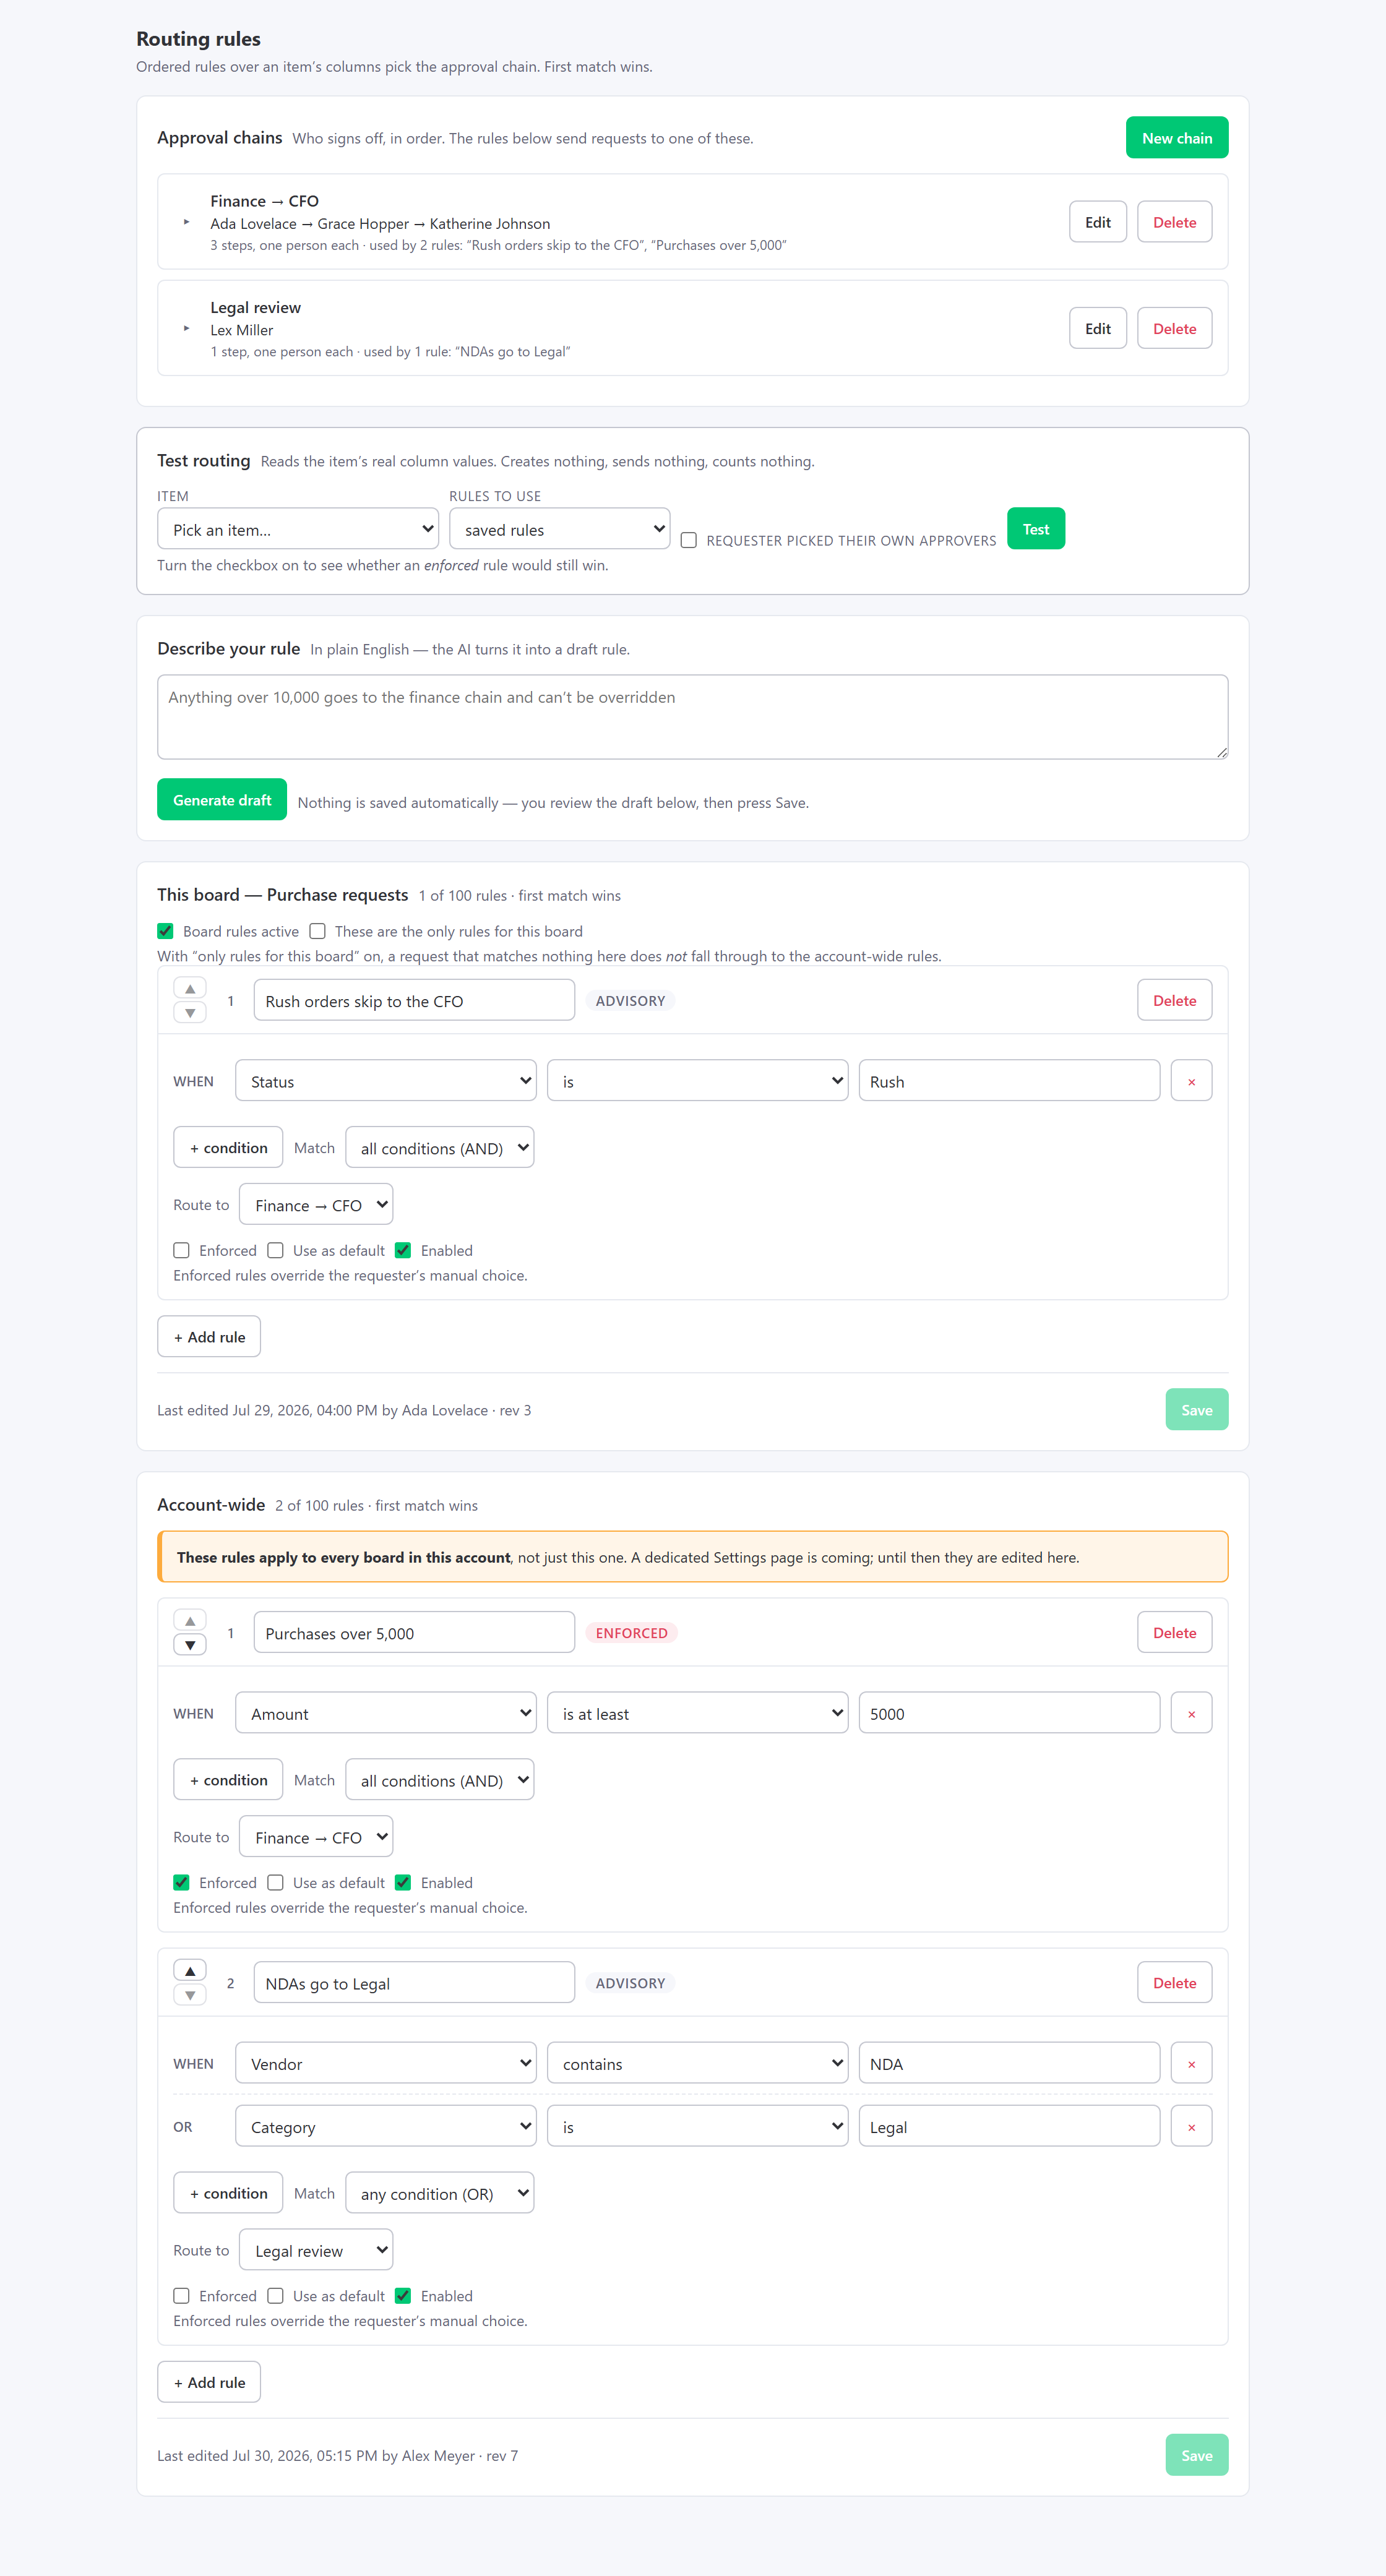
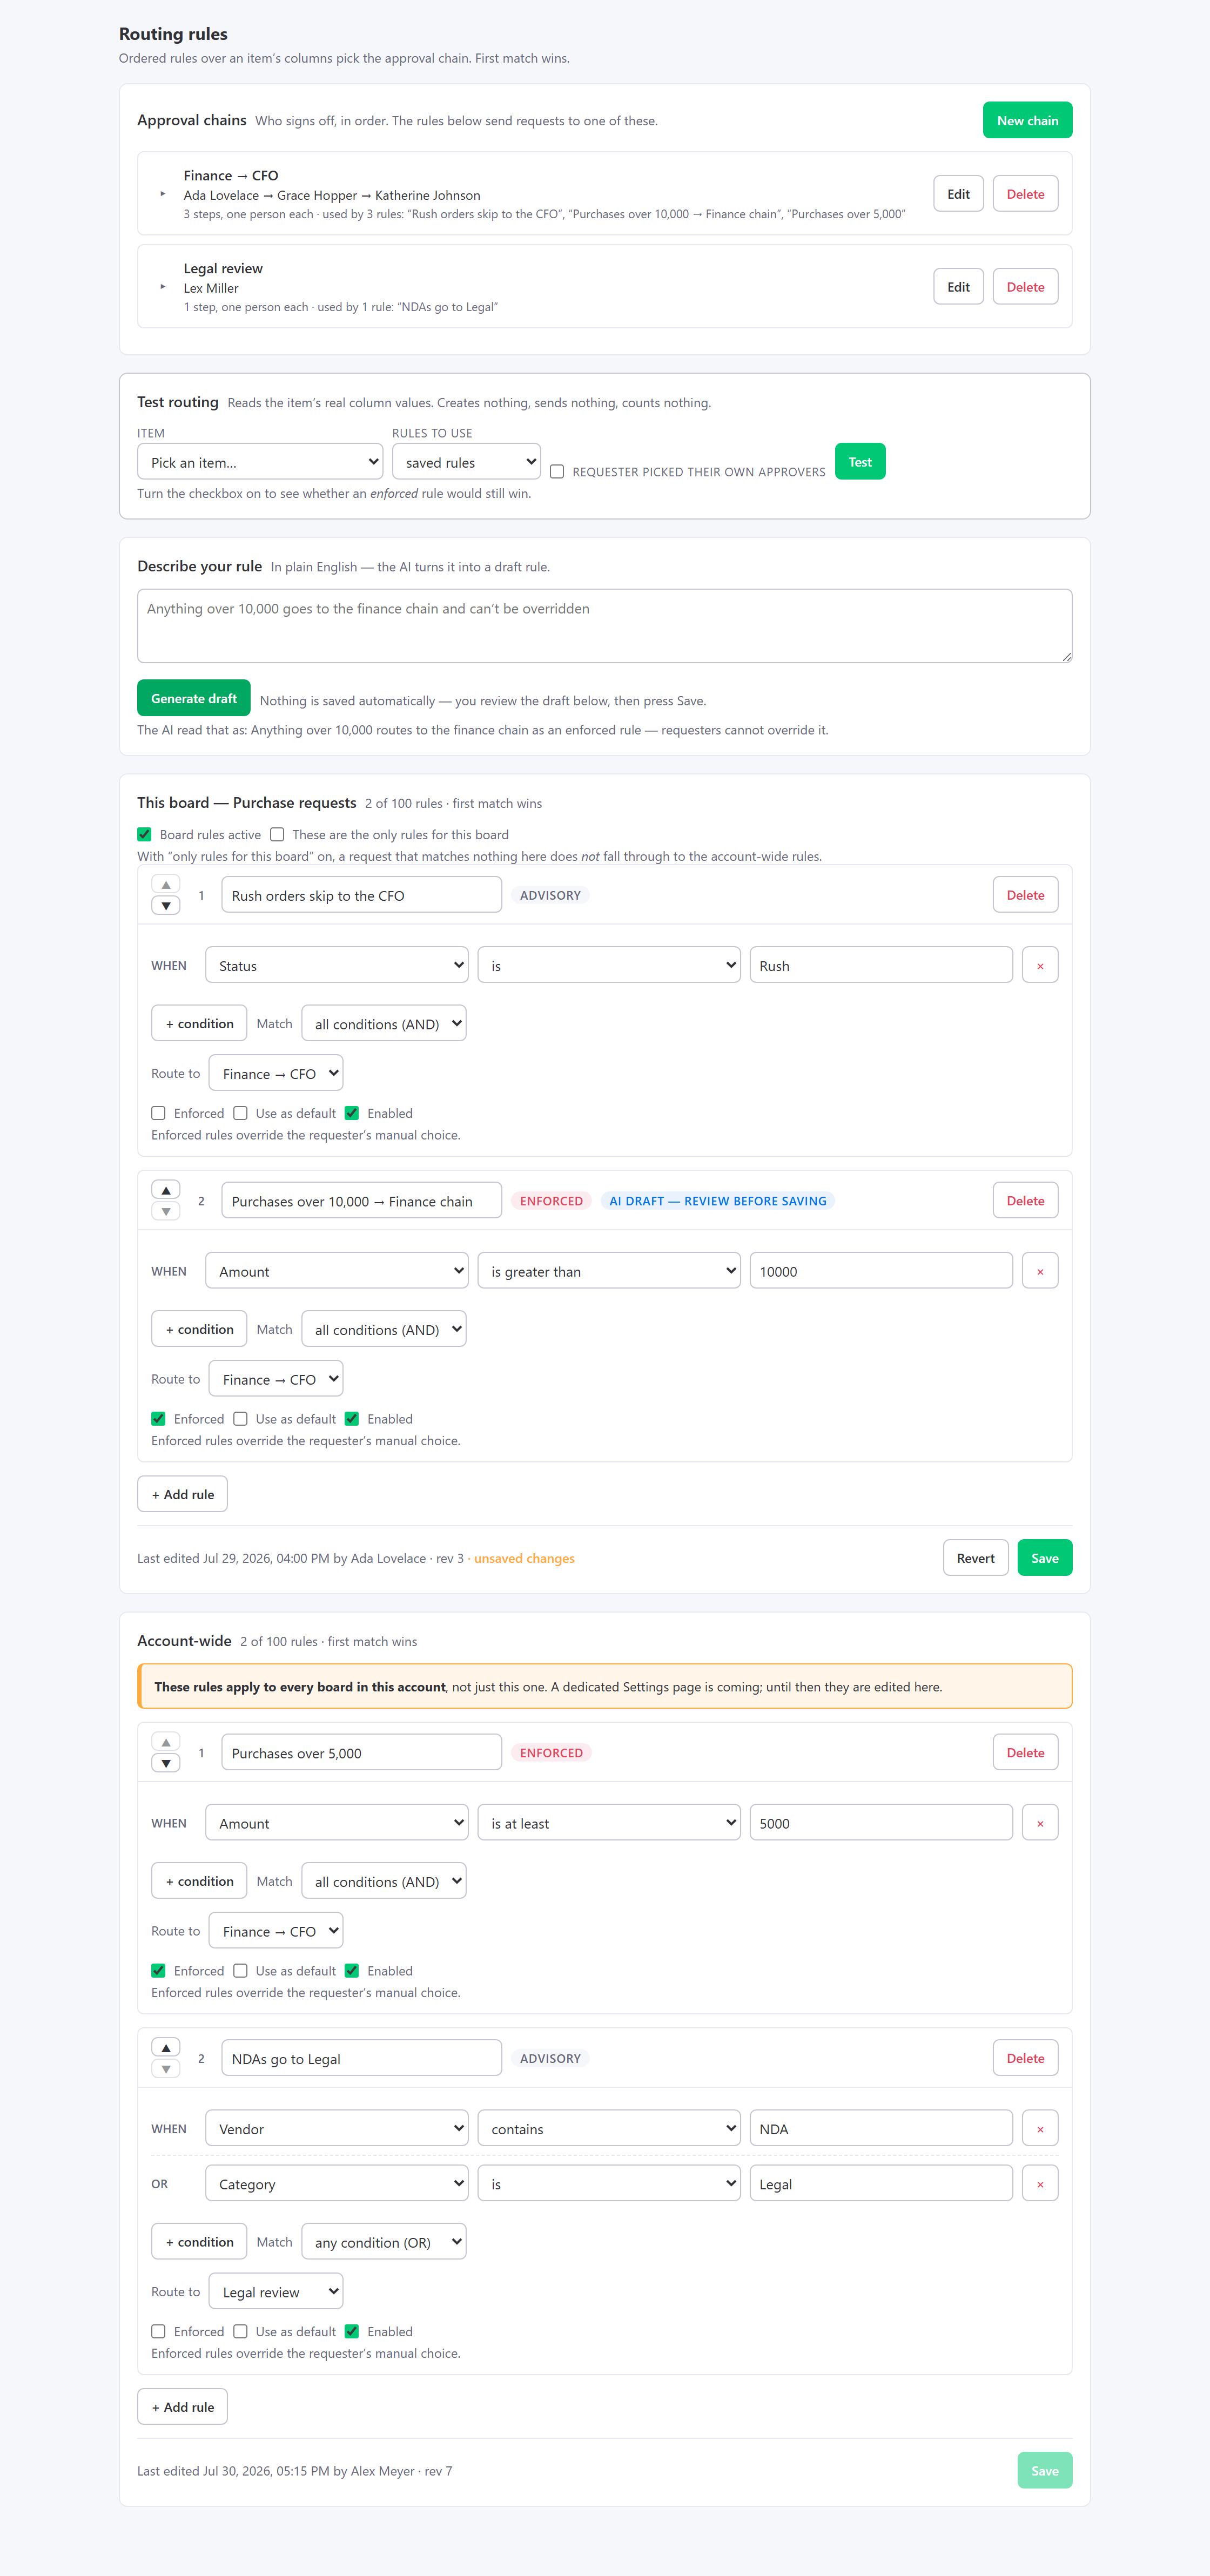
Stop deciding who approves things. Write the policy down once — “anything over 5,000 goes to the CFO” — and let the item's own column values pick the chain.
Chains vs rules — two pieces, and you need both
| Piece | What it is |
|---|---|
| Approval chain | Who signs off, in order — e.g. “Manager”, or “Finance → CFO”. A chain knows nothing about amounts, boards or items, and never fires by itself. Name chains after people or roles. |
| Routing rule | When a chain is used — e.g. “Amount is at least 5,000 → Finance → CFO”. A rule reads the item's real column values the moment a request starts and picks the chain. Name rules after policy. |
Writing a rule
- Give it a name — up to 80 characters. This is what shows up in the request dialog and the audit trail, so name it like a policy: “Purchases over 5,000”.
- Add conditions. Each one is a column, a test, and a value. Up to 10 per rule.
- Choose Match: all conditions (AND) or any condition (OR). It's one setting for the whole rule — you can't mix AND and OR inside a single rule, and there are no nested groups. If you need that, write two rules and order them.
- Pick the chain template under Route to. Routing to a template is the only thing a rule does — it doesn't send notifications or set fields.
- Leave Enabled on, decide whether it's Enforced, and press Save.
Describe your rule in plain English
Don't want to assemble conditions by hand? The Rules tab has a Describe your rule card. It's always visible, but only account admins can use it, and only once a board is picked — opened from Settings without a board, the screen first shows a Pick a board card, and until then the box says why it's disabled. Type the policy the way you'd say it — “Anything over 10,000 goes to the finance chain and can't be overridden” — and press Generate draft. The rule builder opens pre-filled with the conditions, the route and the enforced flag, ready for your review. Nothing is saved until you press the normal Save button: the AI drafts, you commit.
Which columns, and which tests
Rules read number, status, dropdown and text columns. The available tests change with the column type — the dropdown only ever offers you tests that make sense:
| Column type | Tests you can use |
|---|---|
| Number | is · is not · is greater than · is at least · is less than · is at most |
| Status | is · is not |
| Dropdown | is · is not · contains |
| Text (incl. long text) | is · is not · contains |
Text comparison is trimmed and case-insensitive, and contains is a plain substring test — never a regular expression. Number columns compare numerically; a number column holding something non-numeric simply never matches.
is fails, is not succeeds, and every numeric test fails. If that's not what you want, add a second condition.Board rules vs account-wide rules
Rules live in two places, and both are edited on the same screen:
- This board — rules that only apply to the board you're looking at.
- Account-wide — rules that apply to every board in the account.
Evaluation runs board rules first, then account-wide rules, and the first match wins — evaluation stops there. So a board rule naturally overrides an account-wide one just by existing.
Two board-level switches control the interaction:
| Switch | Effect |
|---|---|
| Board rules active | Off, and this board's rules are skipped entirely. Account-wide rules still apply — turning board rules off never means “no approvals”. |
| These are the only rules for this board | On, and an item that matches nothing here does not fall through to the account-wide rules. Use it when a board's policy is genuinely its own. |
Within a scope, rules run top to bottom. Reorder them with the ▲ / ▼ buttons on each rule — there's no drag-and-drop. One rule per scope can be marked Use as default; it's always evaluated last in its scope, whatever position it's sitting in.
Enforced vs advisory
| Enforced | Advisory | |
|---|---|---|
| The checkbox | Enforced ticked | Enforced unticked |
| In the request dialog | Approver picker replaced by a read-only chain naming the rule | A suggestion banner; the picker stays editable and pre-filled |
| If the requester picked someone else | The rule wins | The requester wins |
The full order of precedence at send time is: enforced rule → the requester's explicit choice → an advisory rule → the automation recipe's mapping.
Test routing — check before you trust
At the top of the rules screen is Test routing. Pick a real item from the Pick an item… dropdown (the board's first 25 items), or choose Type an item id instead… to enter an id, and press Test. It reads that item's actual column values and tells you exactly what would happen. It “creates nothing, sends nothing, counts nothing” — no chain, no email, no usage counted against your plan.
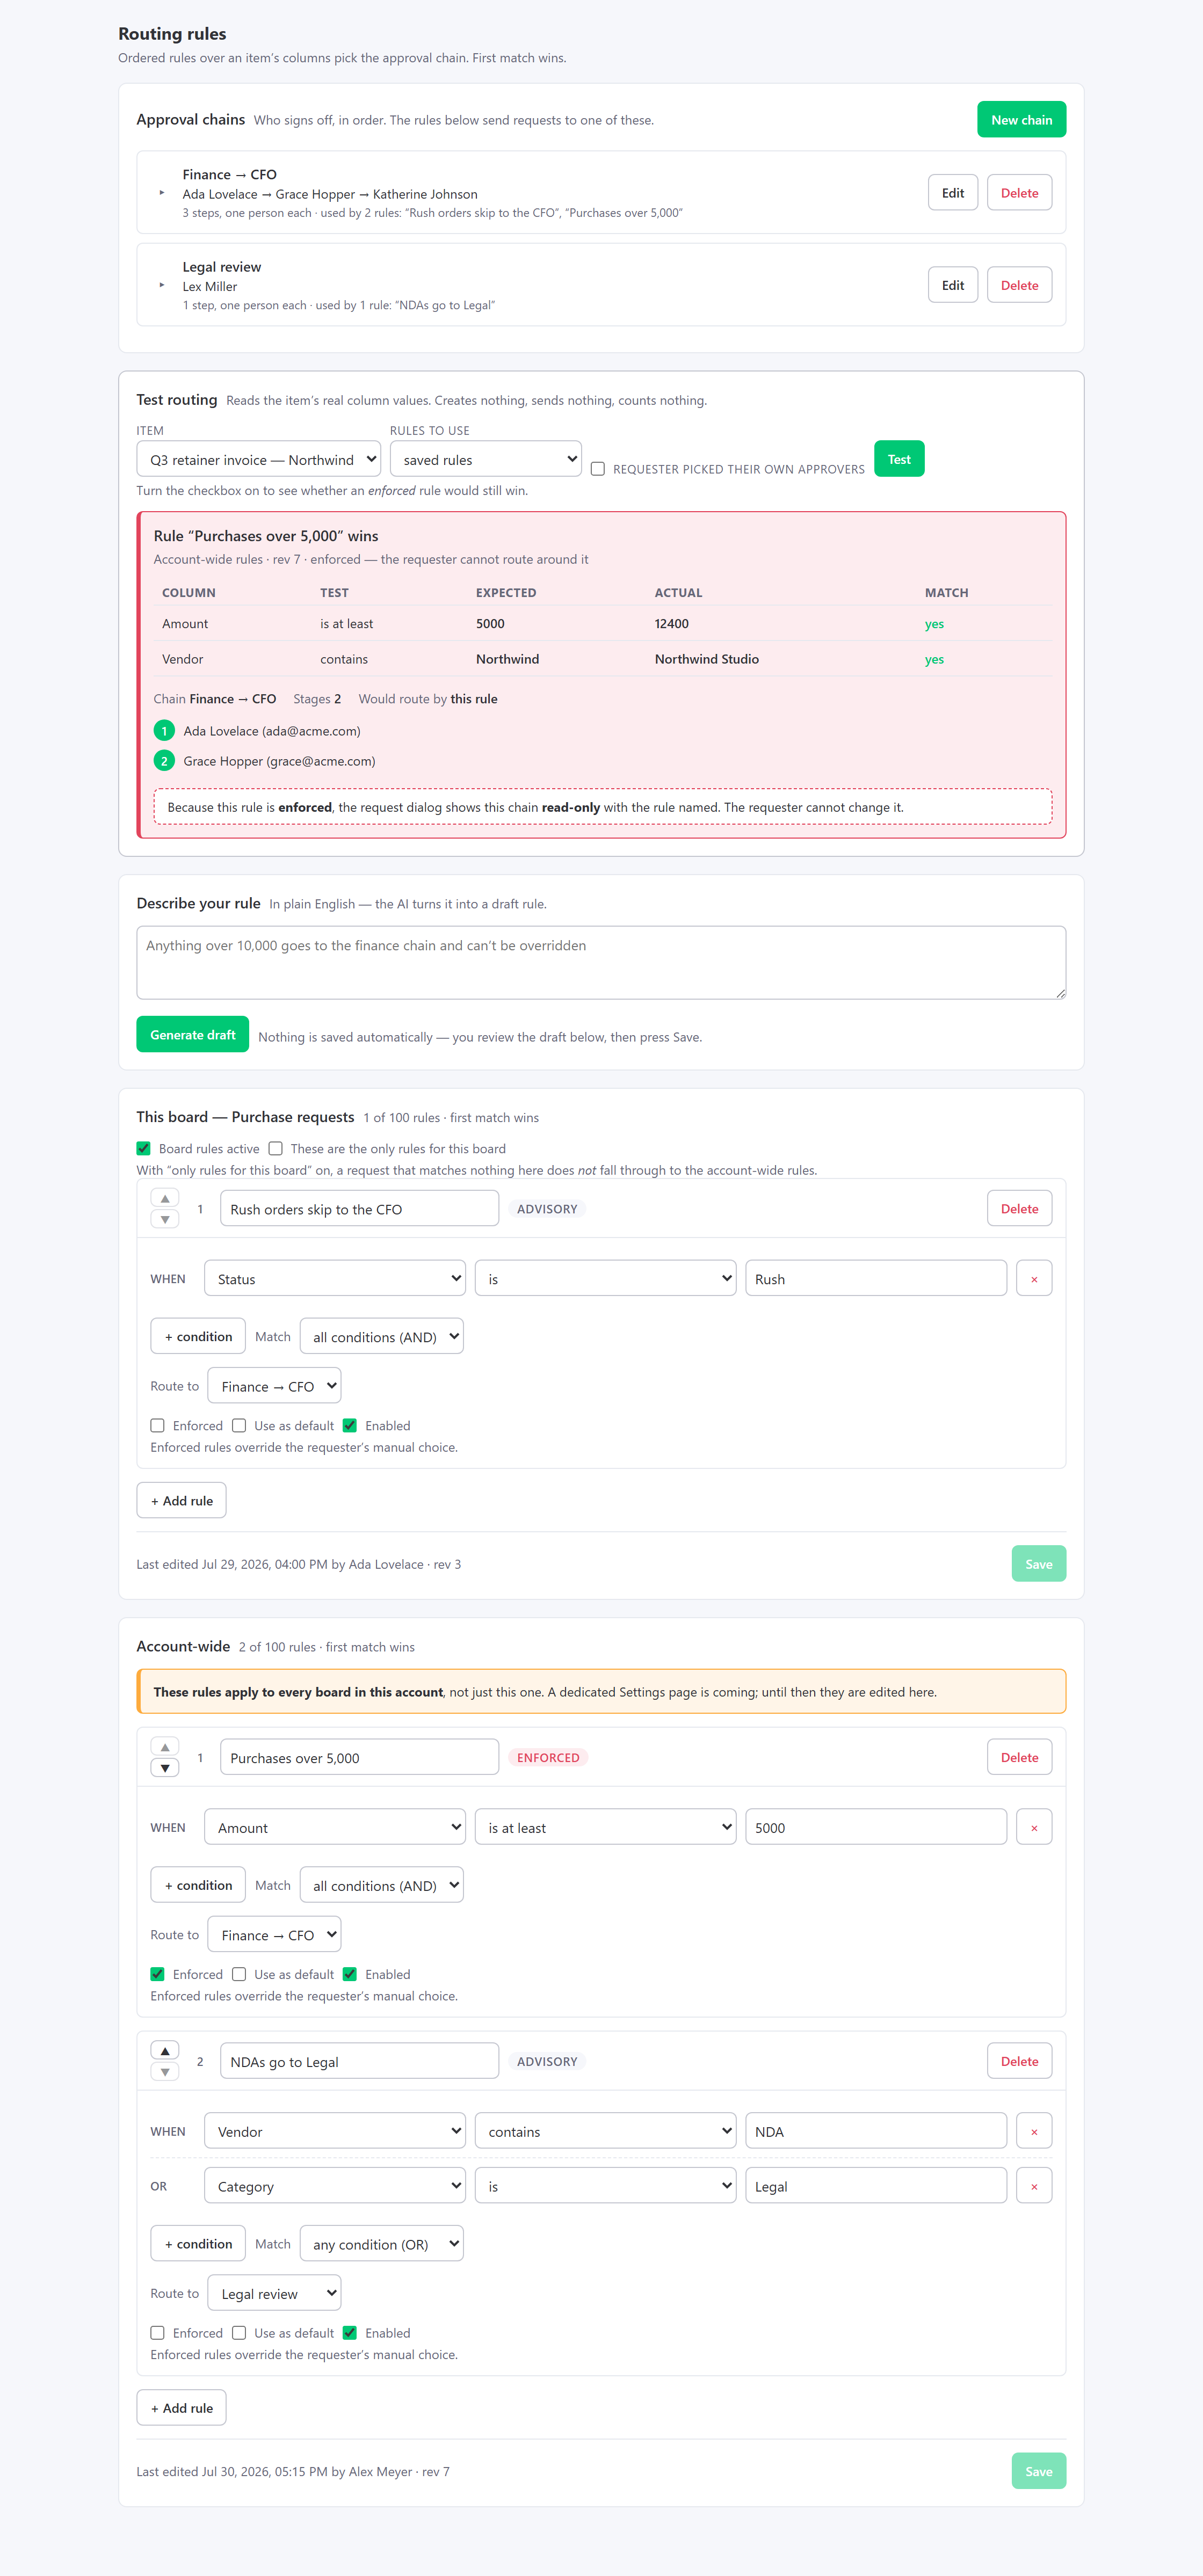
- The verdict names the winning rule, its scope, and whether it's enforced or advisory.
- The table shows each condition: the test, the expected value, the actual value read off the item, and whether it matched. This is how you debug a rule that “should have fired”.
- Underneath: the template, the number of stages, and every approver in order.
- Tick Requester picked their own approvers to see whether an enforced rule would still win — it will, and that's the point.
- You can also test your unsaved edits before committing them, using the Rules to use dropdown.
- If nothing matches you get “No rule matched”, and it tells you what would route the request instead.
Where to edit rules
Same builder, three doors:
- The Rules tab of the My Approval Queue board view.
- The Approval Rules account-settings view inside monday.
- The Rules tab in the portal, which starts with a board picker.
9 · The Greenlight Portal
A web app for approvers at app.greenlight-approvals.com/portal/. Sign in with monday, and get your whole approval life on one page — including approvals living in other people's monday accounts.
Signing in
Click Continue with monday.com. Greenlight reads your name, email and account so it can show you the right queue — and nothing else. It does not store a personal API token. Your session lasts up to 30 days and expires after a week of not using it.
The Inbox — the one nobody else has
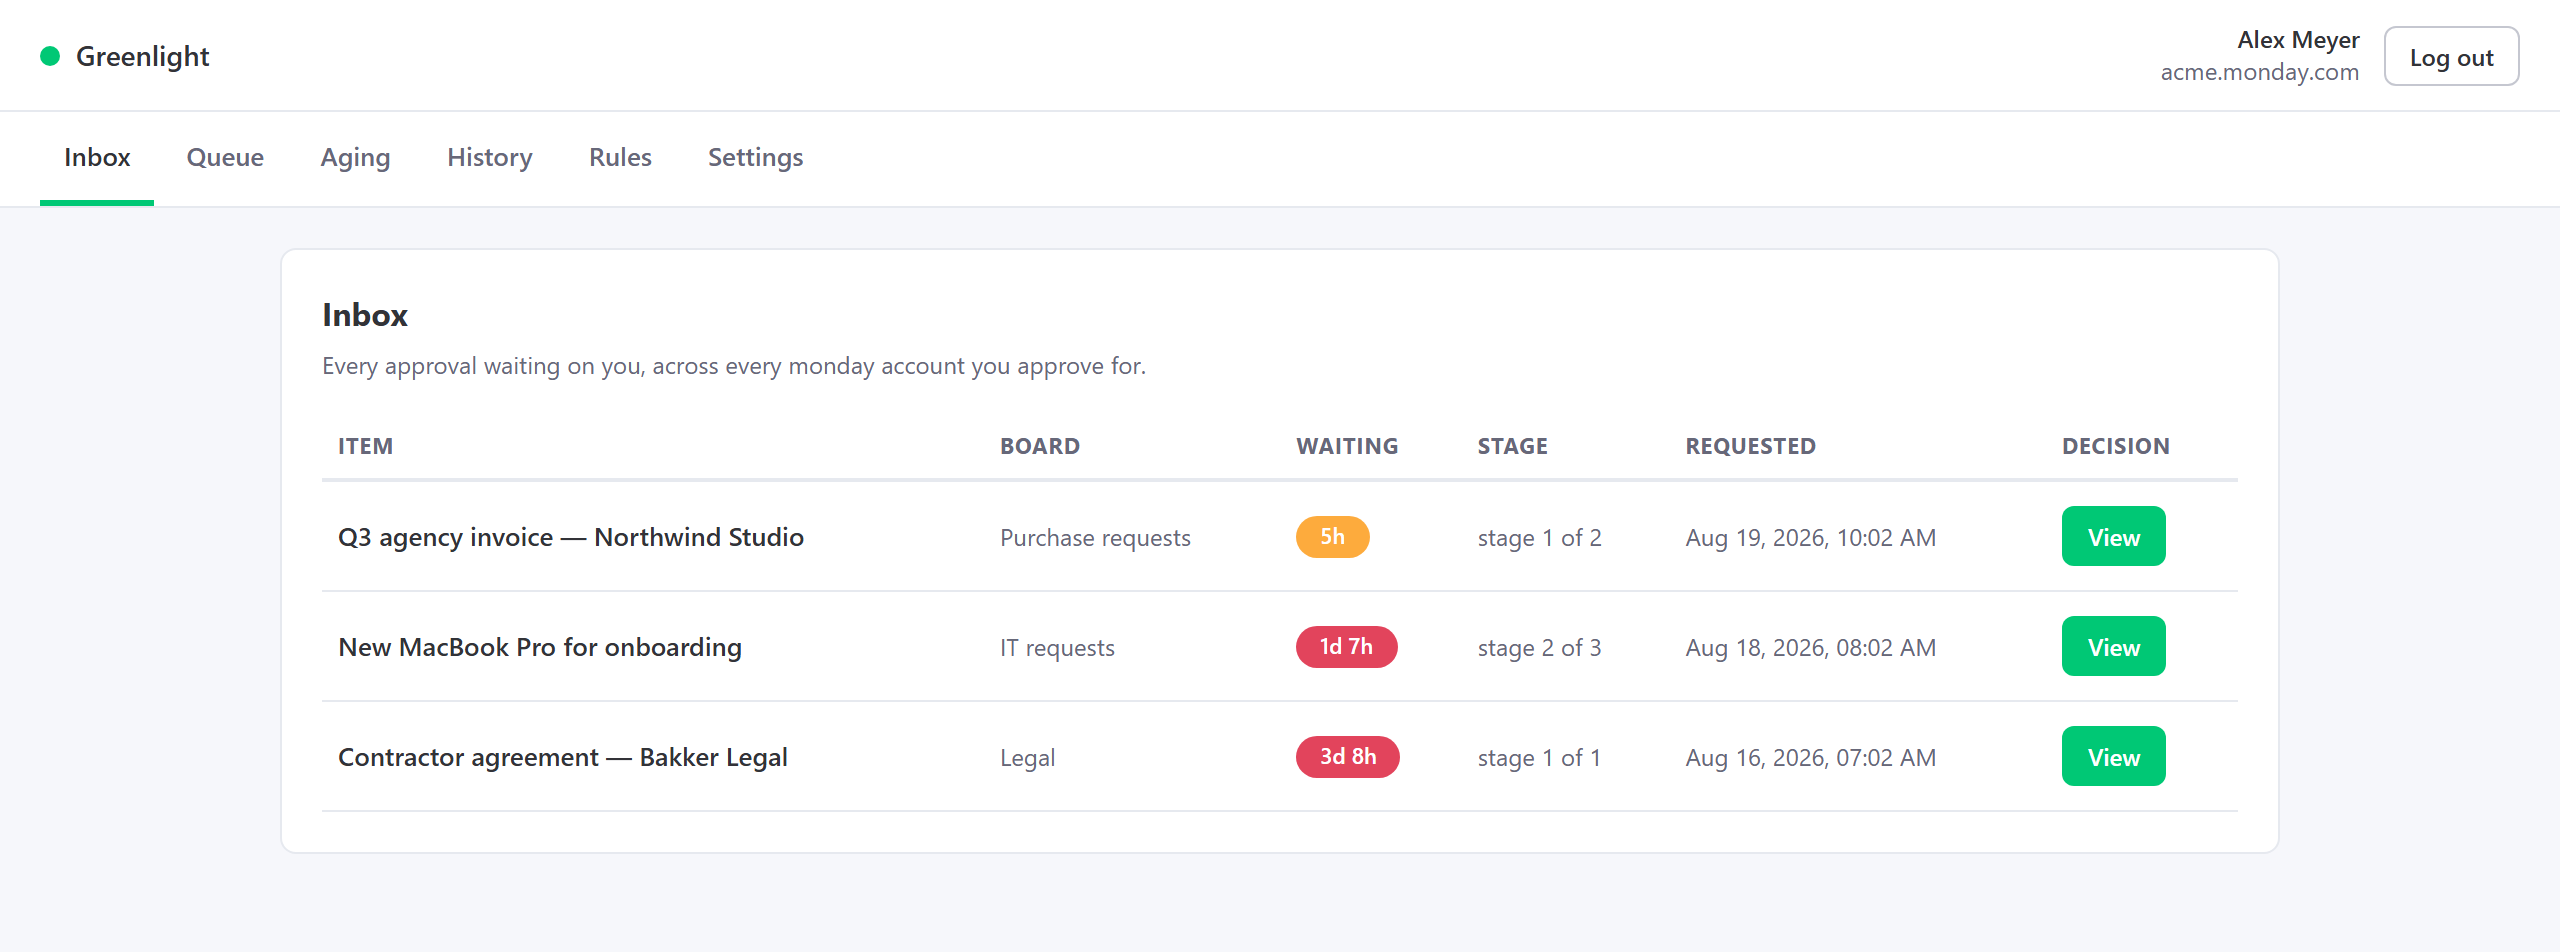
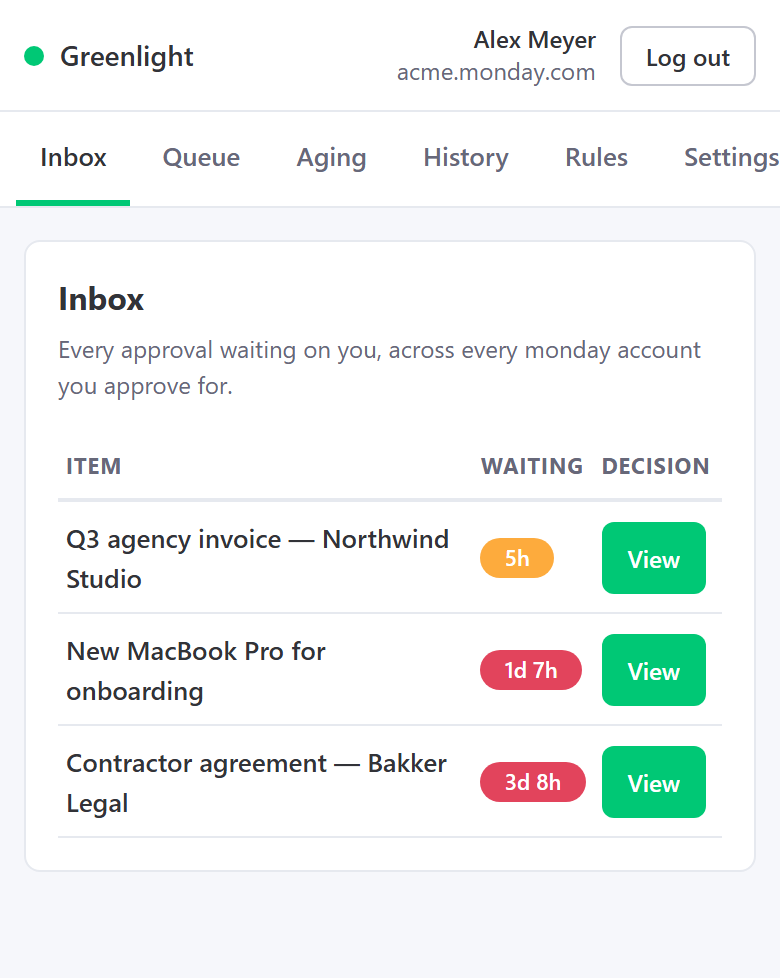
If you approve things for more than one monday account — an agency with client workspaces, a fractional CFO, a consultant on three retainers — every other approvals tool makes you log into each account separately. The Inbox doesn't. It matches on your verified email address and gathers pending approvals from every account that has one waiting for you.
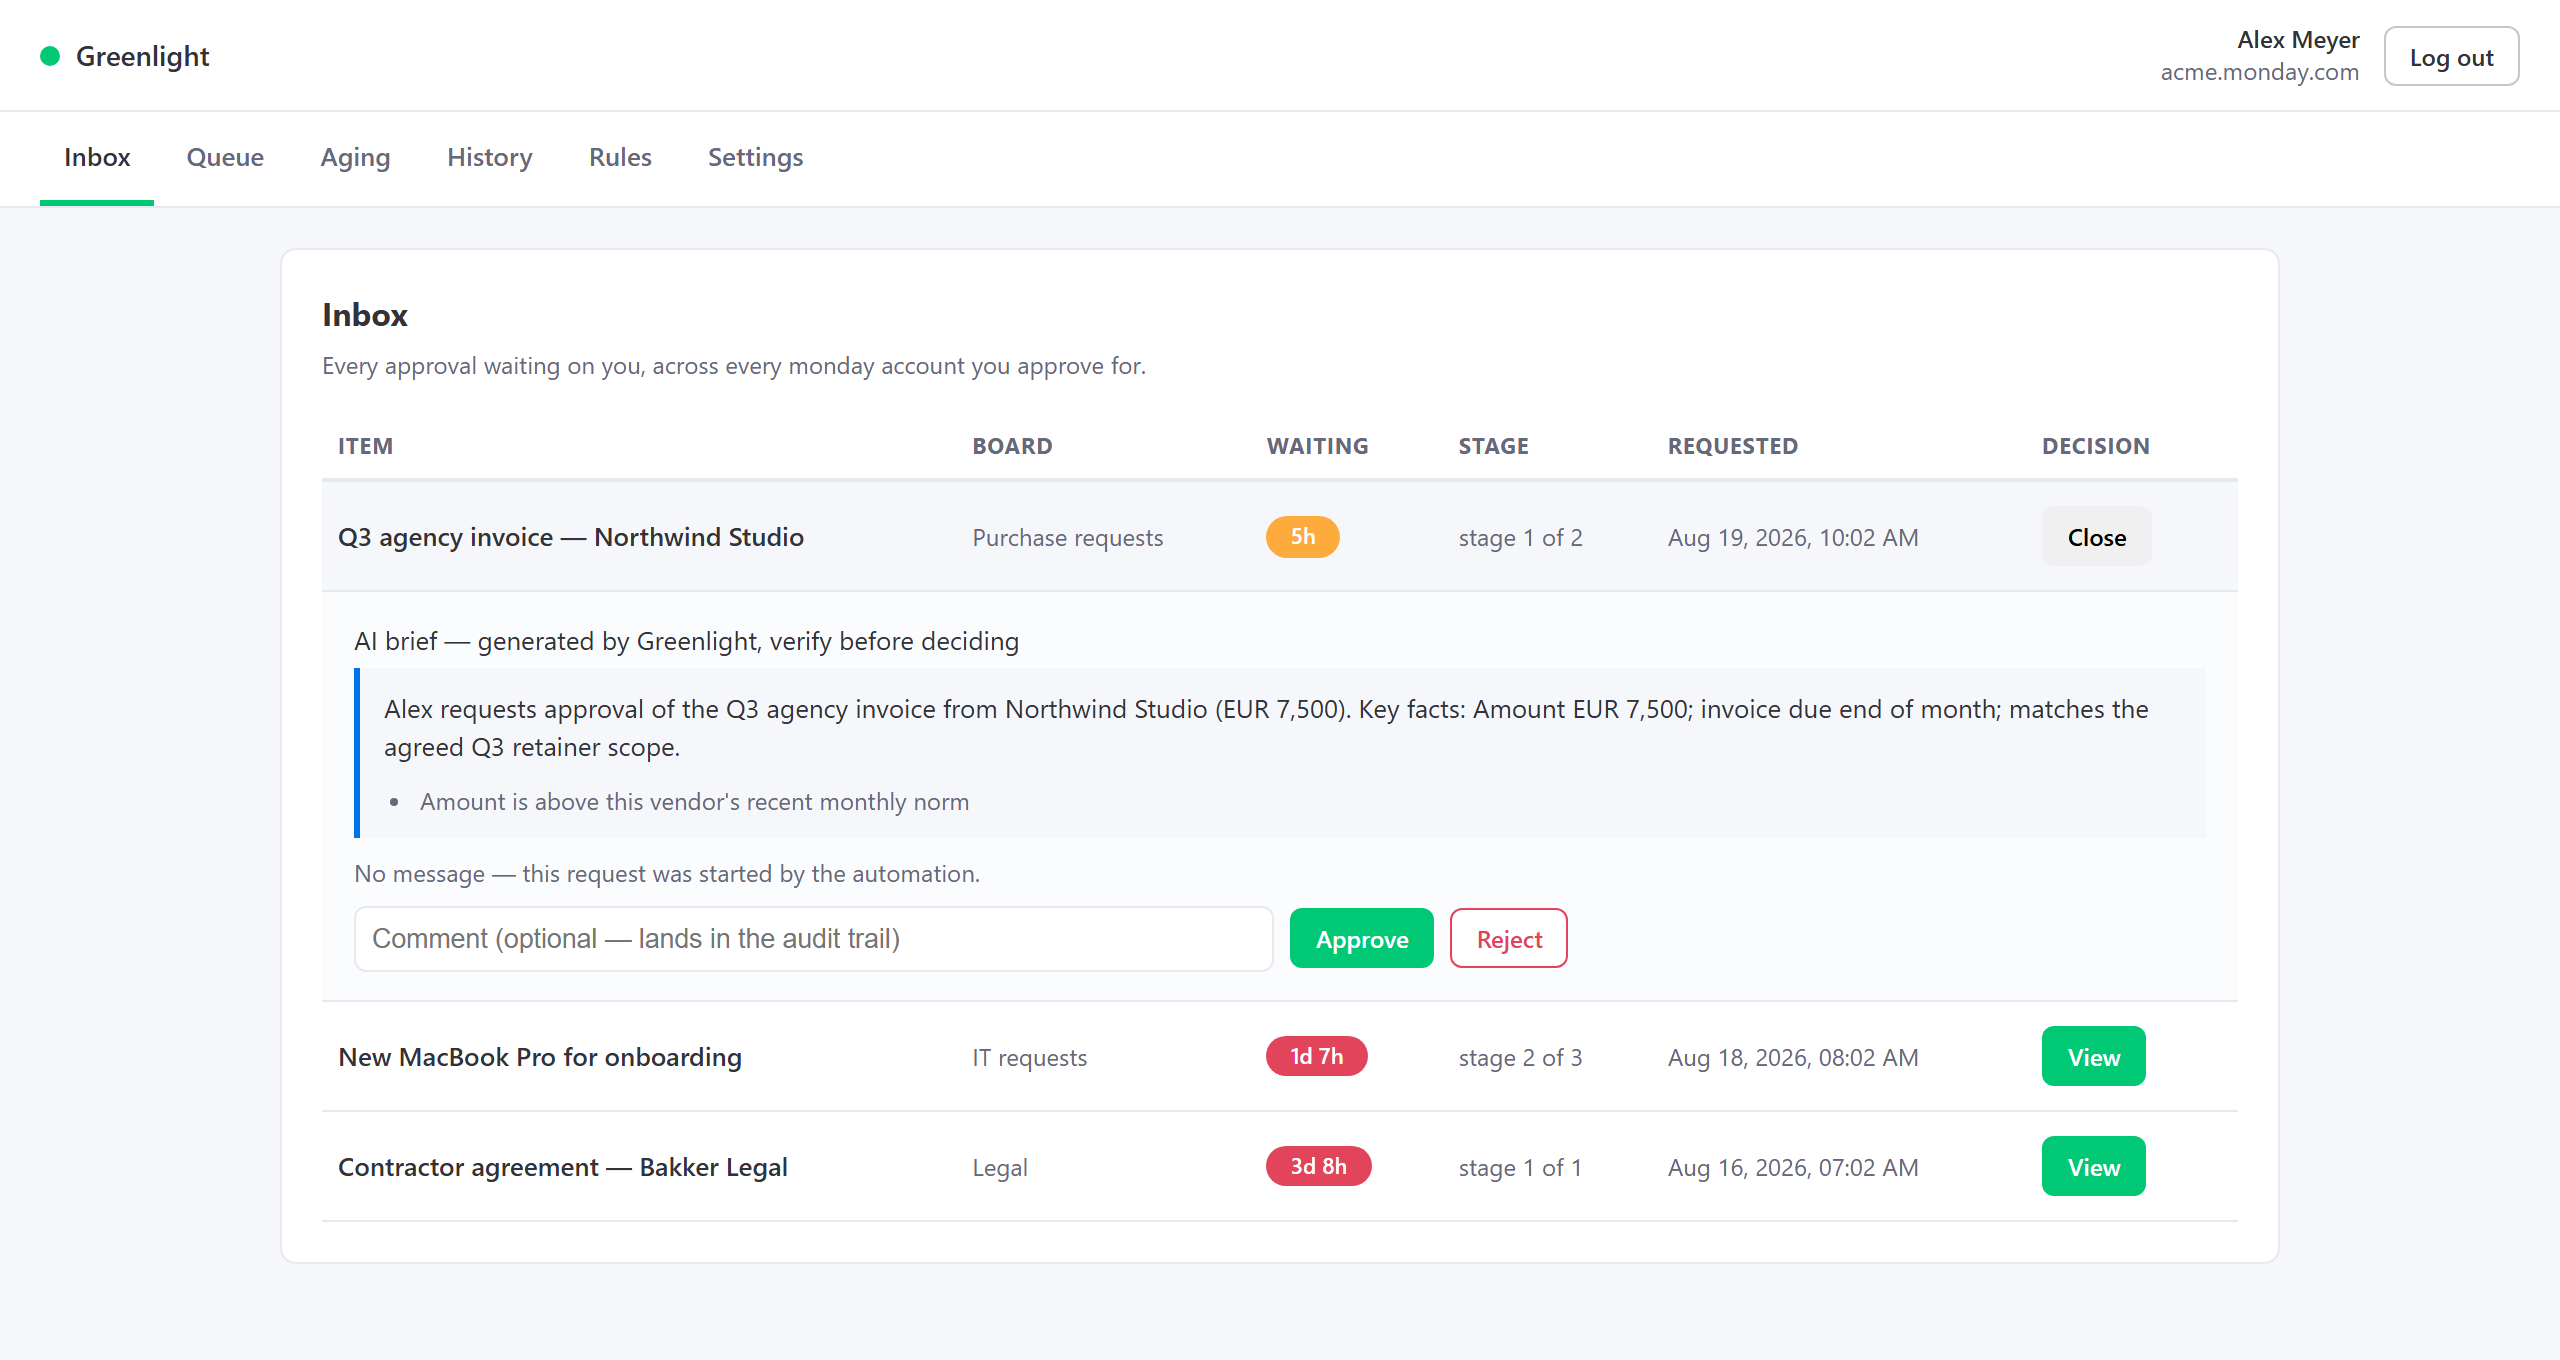
Press View and a row expands in place: the AI brief with its anomaly flags first (§4), then the request details, a comment box and the decision buttons. Requests started by the automation say so — “No message — this request was started by the automation” — because a status flip has no author. Rows in the Queue tab expand the same way.
The rest of the tabs
| Tab | What it's for |
|---|---|
| Onboarding | The first-run checklist. Only appears until you dismiss it. |
| Inbox | Everything waiting on you, across every account. |
| Queue | The same list, narrowed to the account you're signed into. Approve and Reject on every row. |
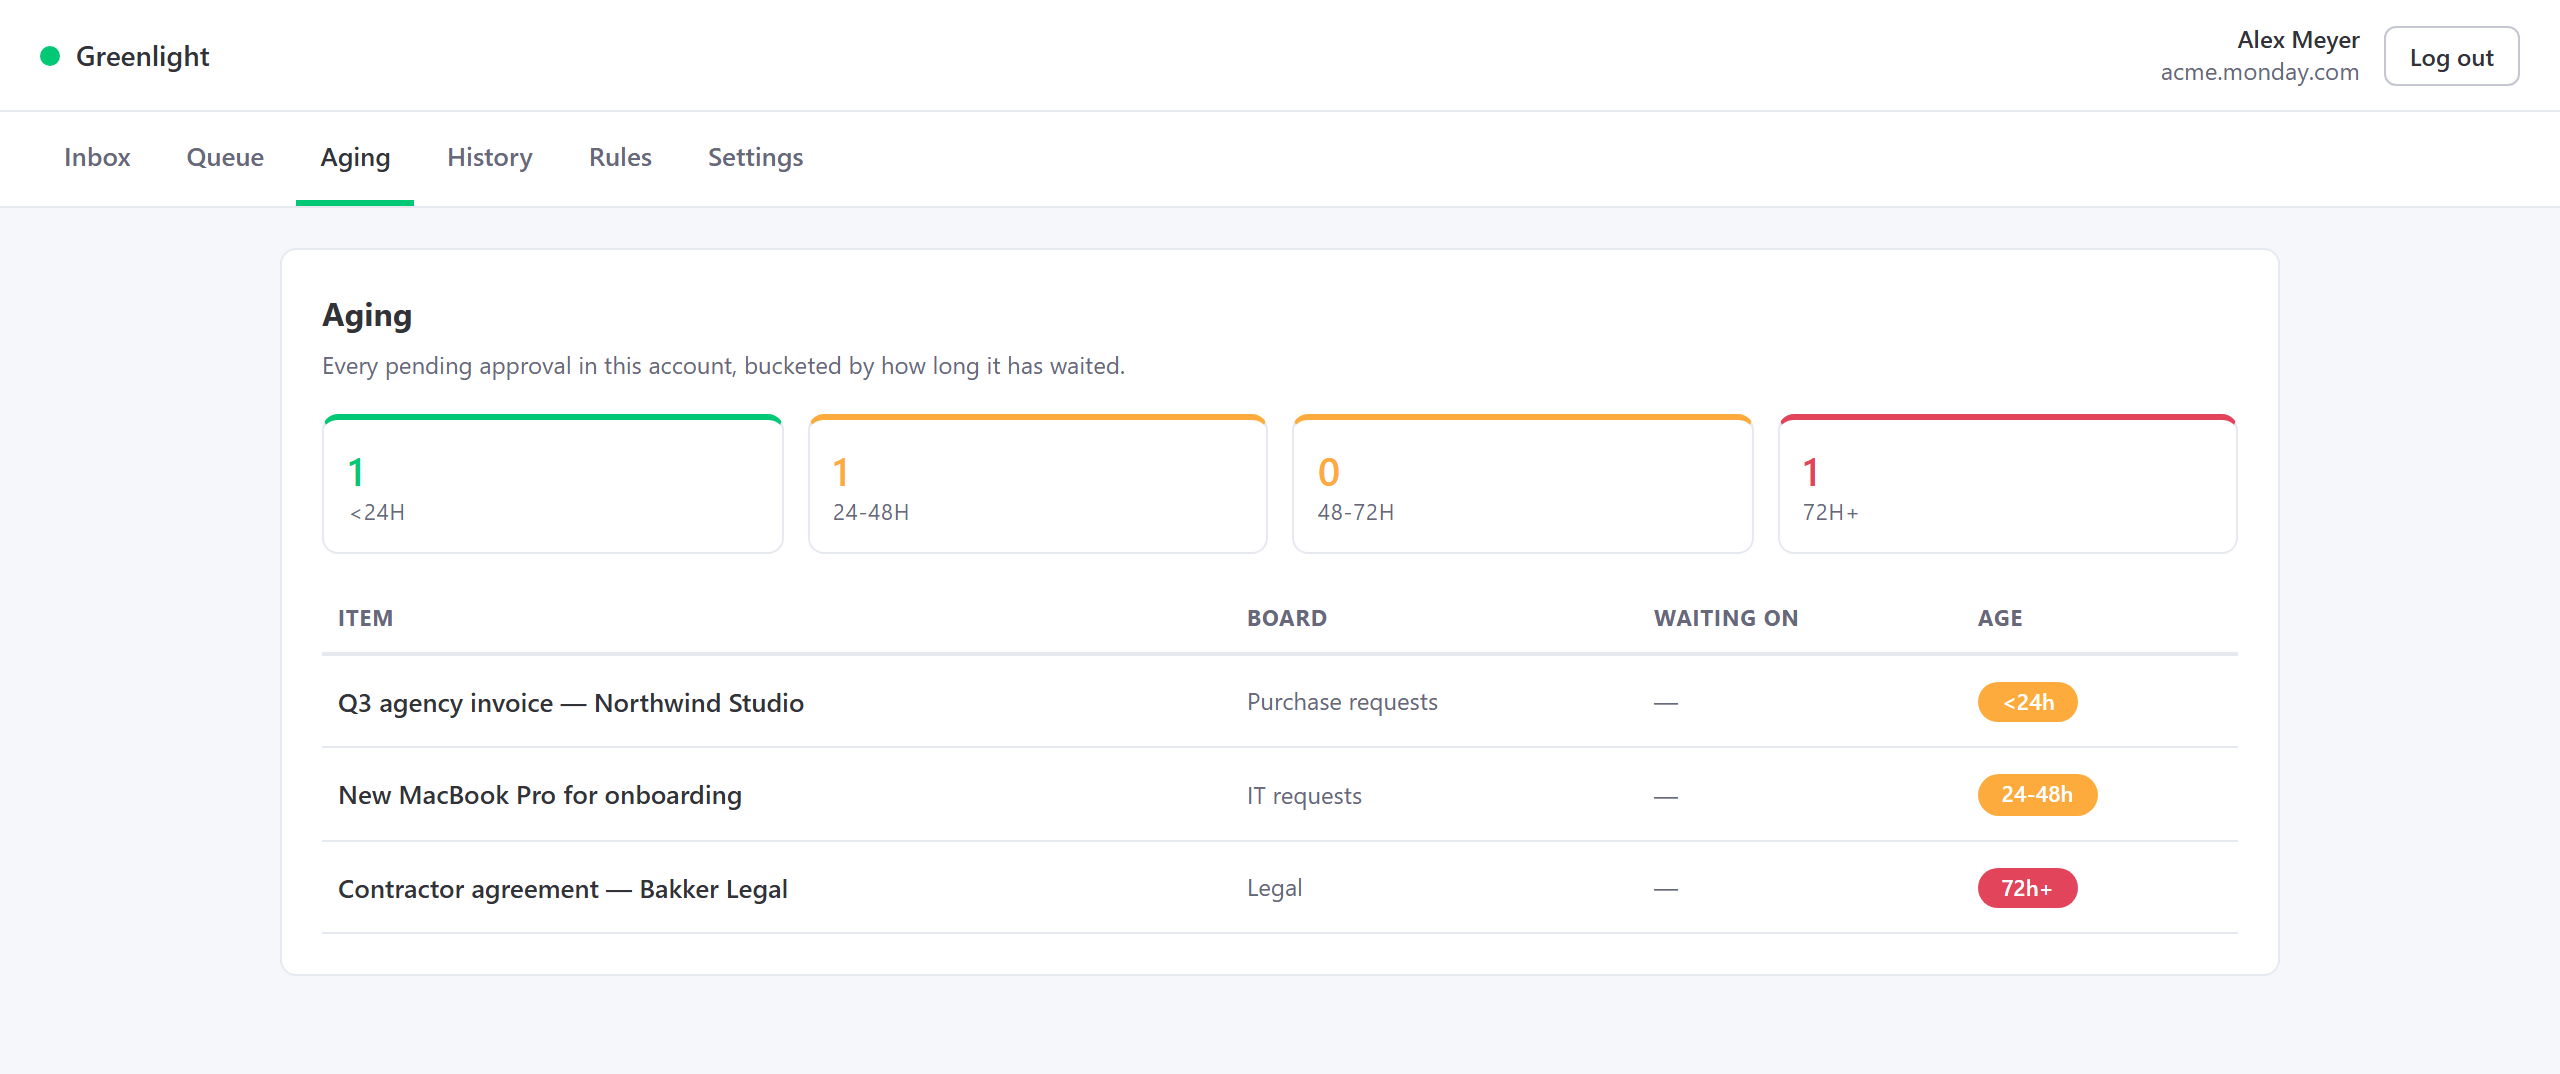
| Aging | Every pending approval in this account, bucketed by how long it's waited: under 24h, 24–48h, 48–72h, and 72h+. |
| History | What was decided in this account this month — item, board, outcome, who decided, when. Cancelled requests show up too, with a grey Cancelled badge and who cancelled them. |
| Rules | A rules overview — account-wide rules at the top, then only the boards that actually have rules (with counts), and an “Add rules to a board” picker. Opens the builder (§8). |
| Settings | Who you're signed in as, your plan and this month's usage, and the Create my approvals board button. |
The Onboarding checklist
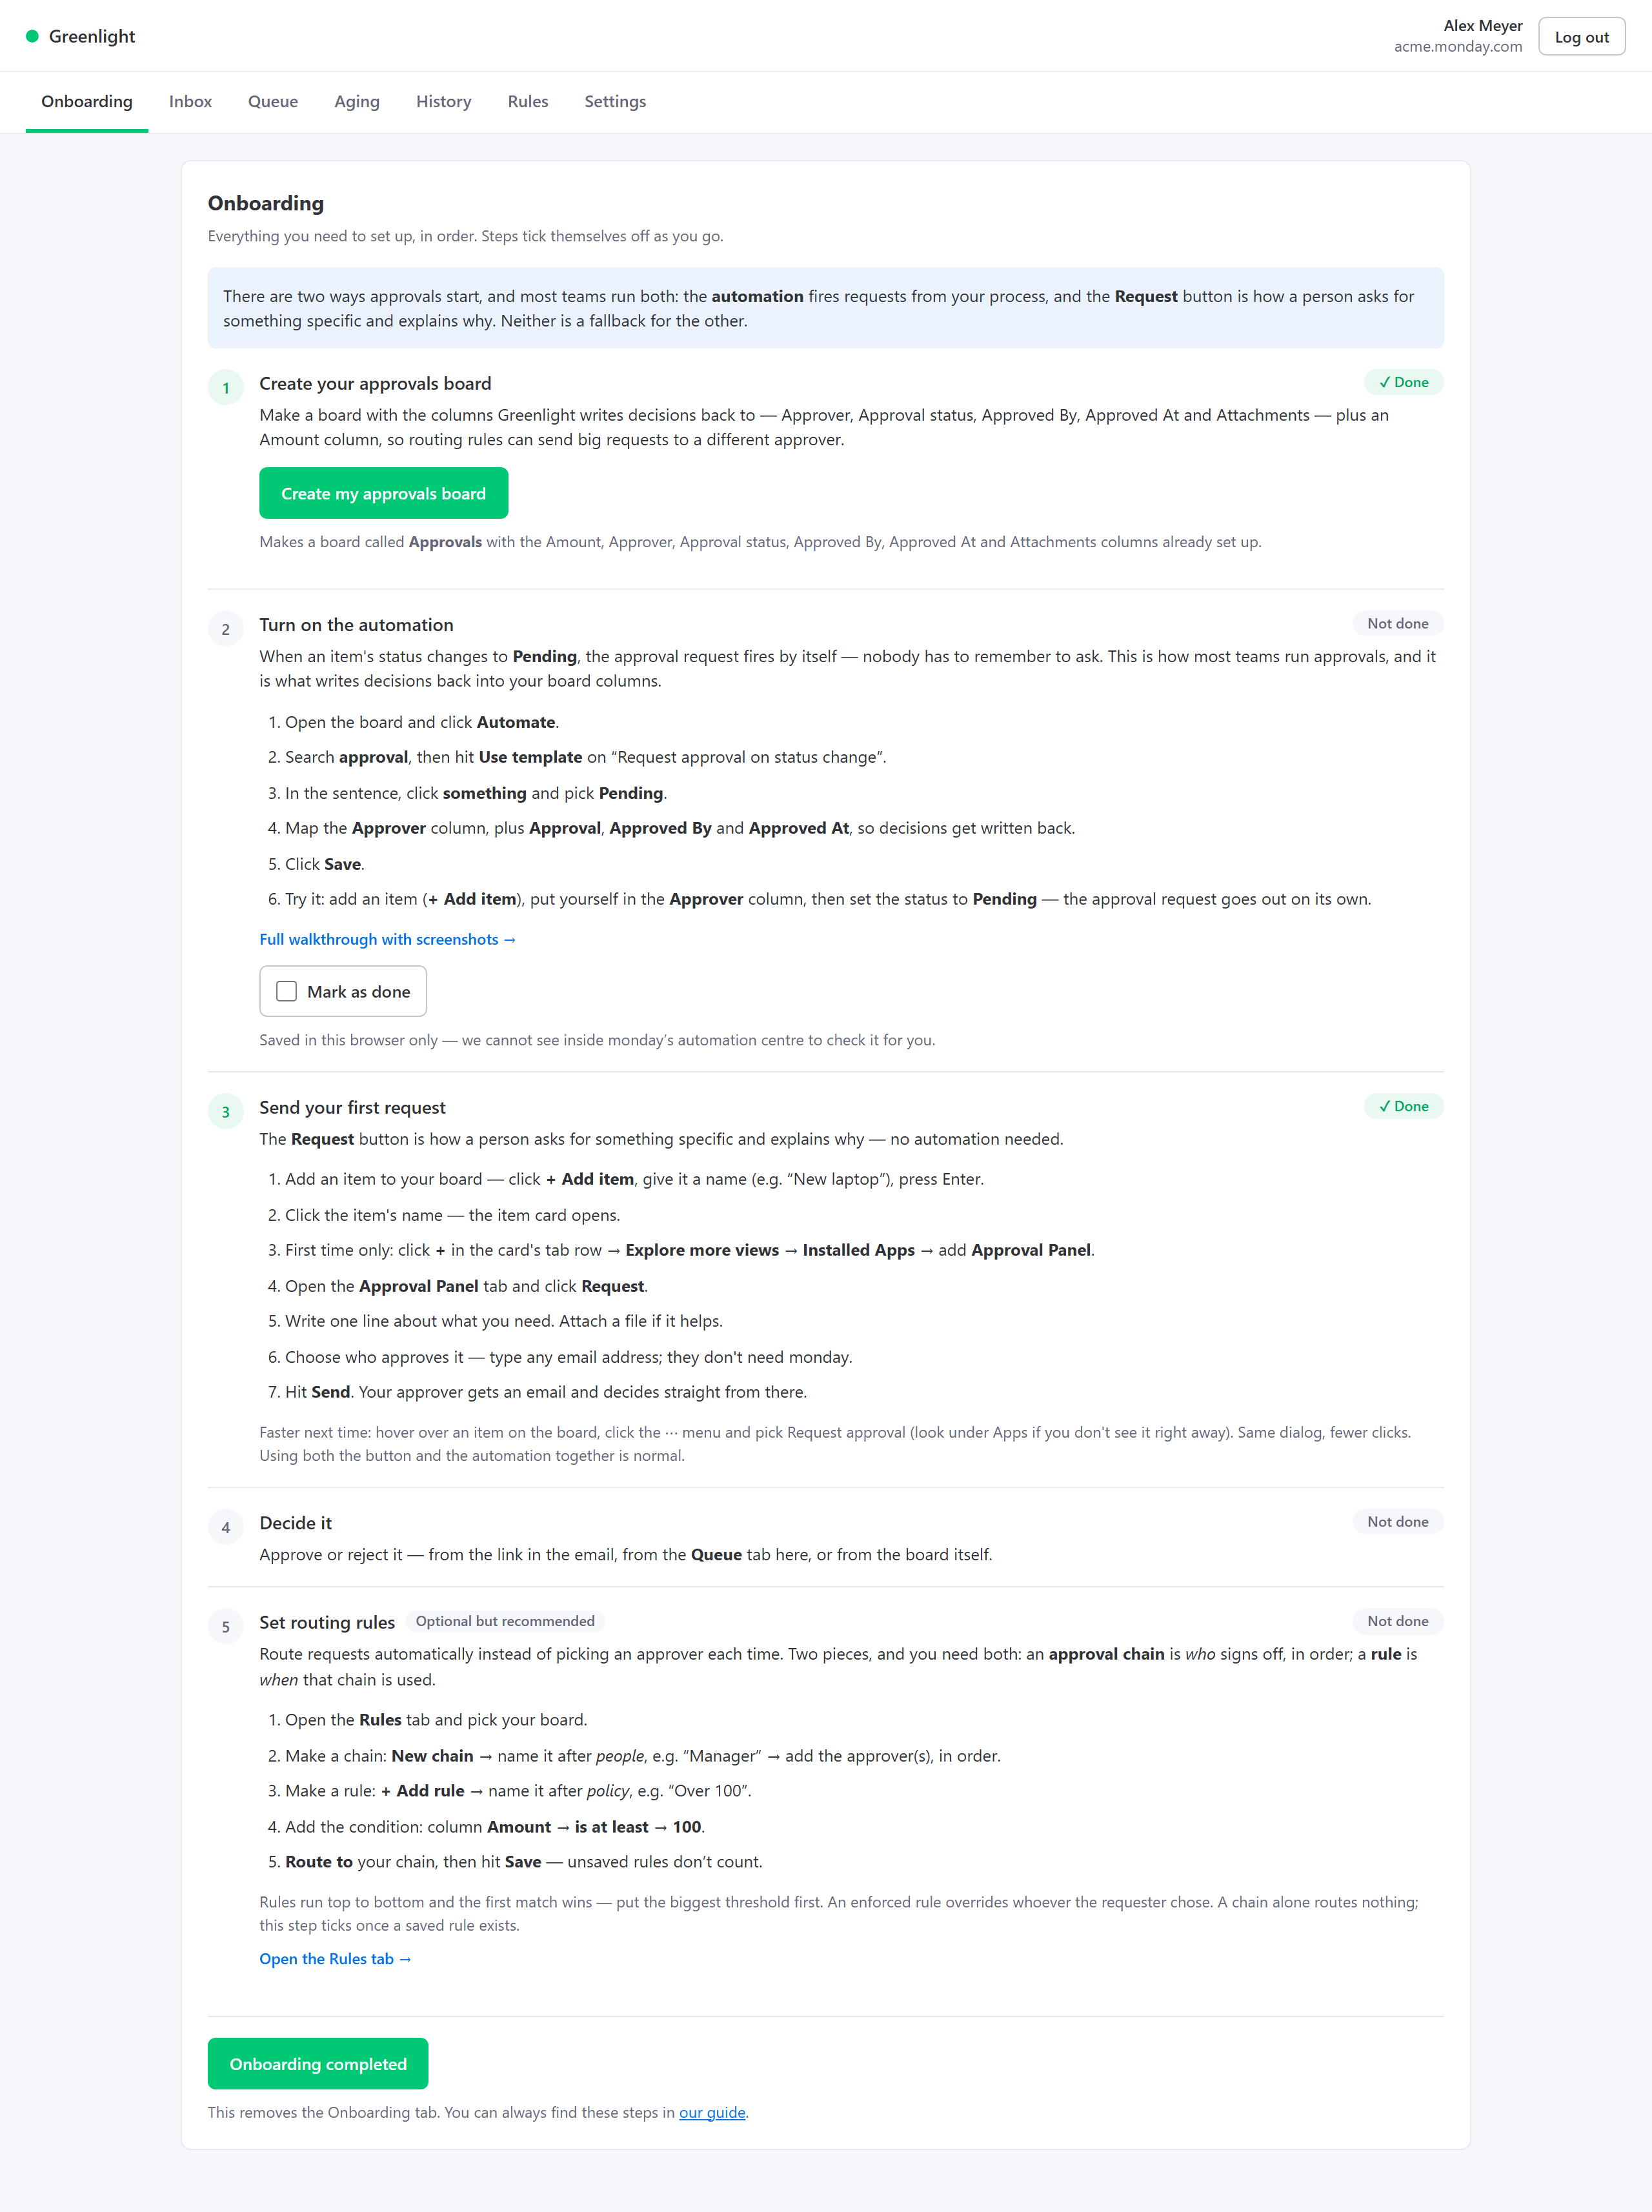
- Create your approvals board — with the button right there. Admins only.
- Turn on the automation — the same steps as §2. monday gives Greenlight no signal for this one, so you tick Mark as done yourself (saved in that browser only).
- Request your first approval — from the item menu or the Approval Panel's Request tab.
- Approve it — from the email, or from the Queue tab here.
- Set routing rules — marked “Optional but recommended”.
On a phone
10 · The Approval Panel (item view)
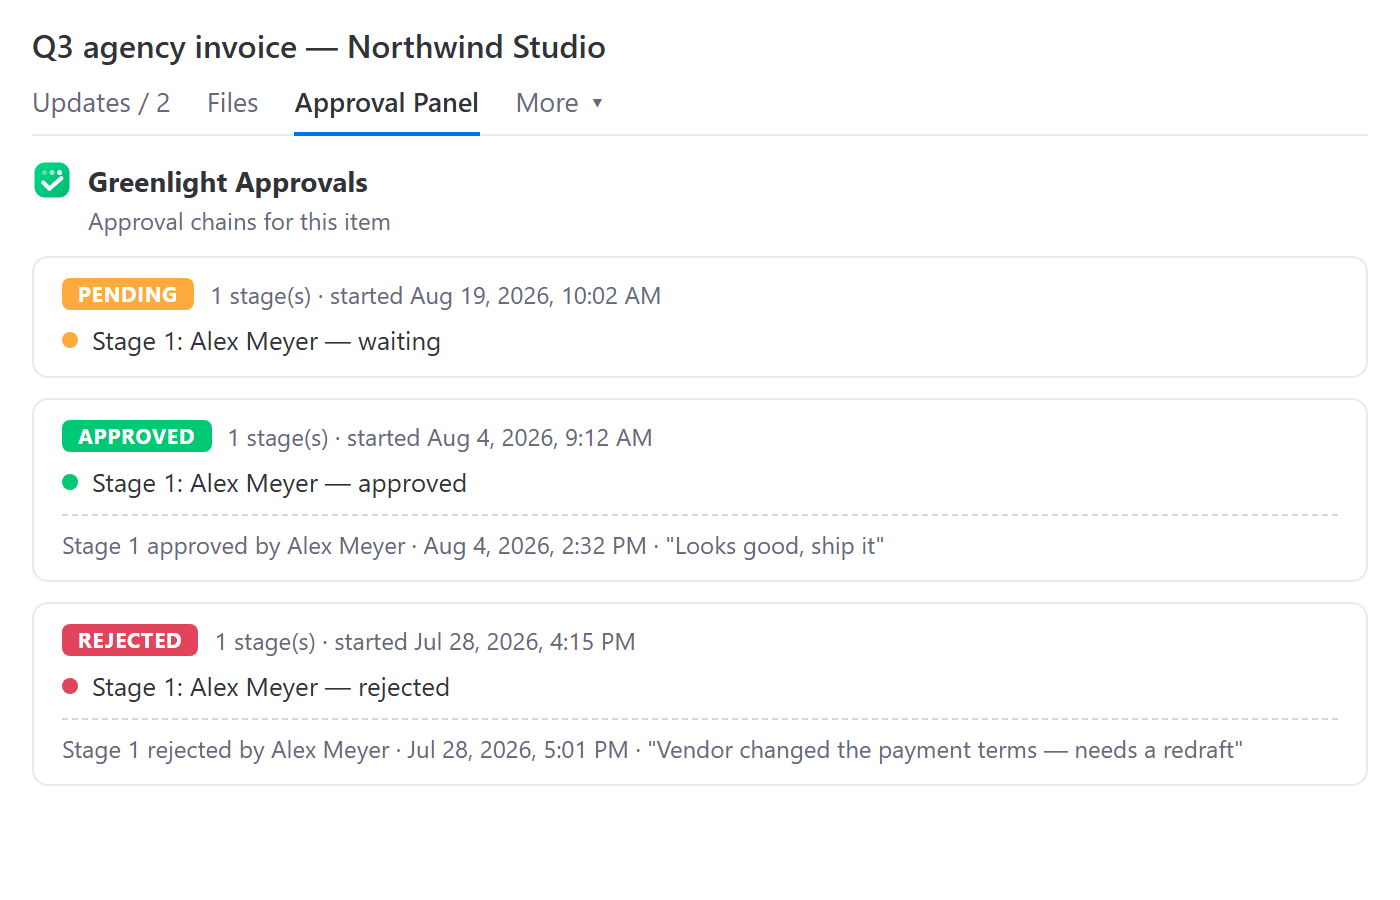
Every item carries its full approval story: chains, stages, who's waiting, decisions and comments — right in the item card. It's also where the Request tab lives, and where you cancel a request.
- Open any item → click + in the item card's tab bar → Explore more views.
- Choose Installed Apps → Approval Panel → Add to item.
Cancel a request
Sent it by mistake, or it's not needed anymore? A waiting request has a Cancel request button in the panel. Click it, add a reason if you want, and confirm with Cancel request — or click Keep it to back out.
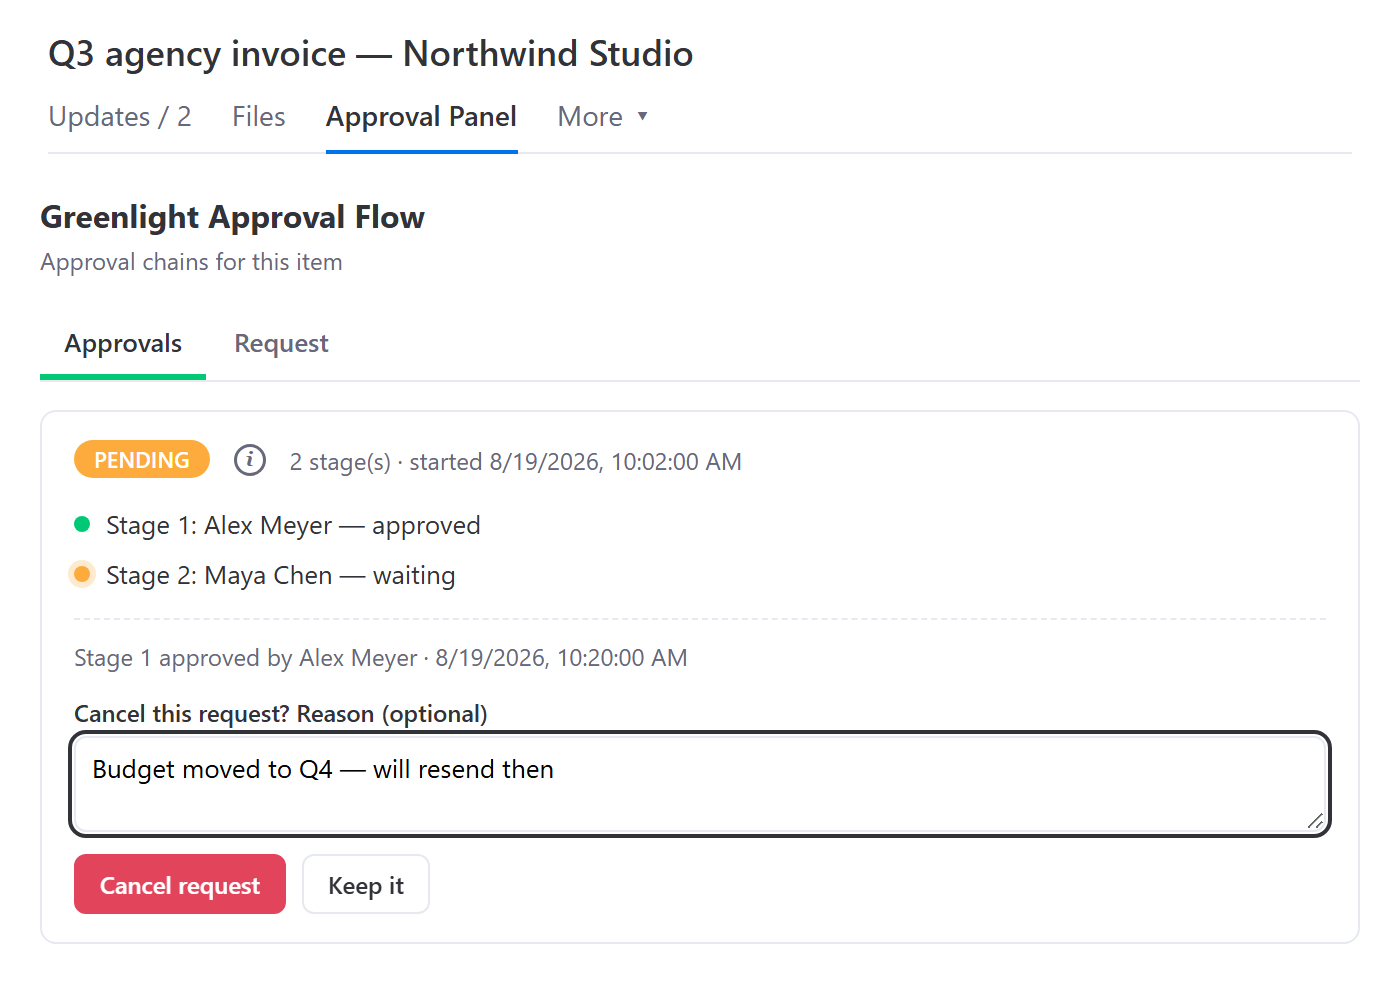
- Who can cancel: the person who sent the request, or a monday account admin. Requests started by the automation have no sender, so only an admin can cancel those. Everyone else doesn't see the button.
- The request is marked Cancelled in the panel — a grey badge, with who cancelled it, when, and the reason. It leaves My Approval Queue, the portal Inbox and Queue, and the aging dashboard.
- The approver's link now opens a “Request cancelled” page, and no decision can be recorded on it.
- The Approval column is cleared, but only if it still says
Pendingand no other request on the item is waiting. Approved By and Approved At are not touched. - An update on the item says “[Greenlight] Request cancelled by Sam Rivera.”, plus the reason if you gave one.
- Only waiting requests can be cancelled. Once a request is approved or rejected, it stays that way.
11 · My Approval Queue (board view)
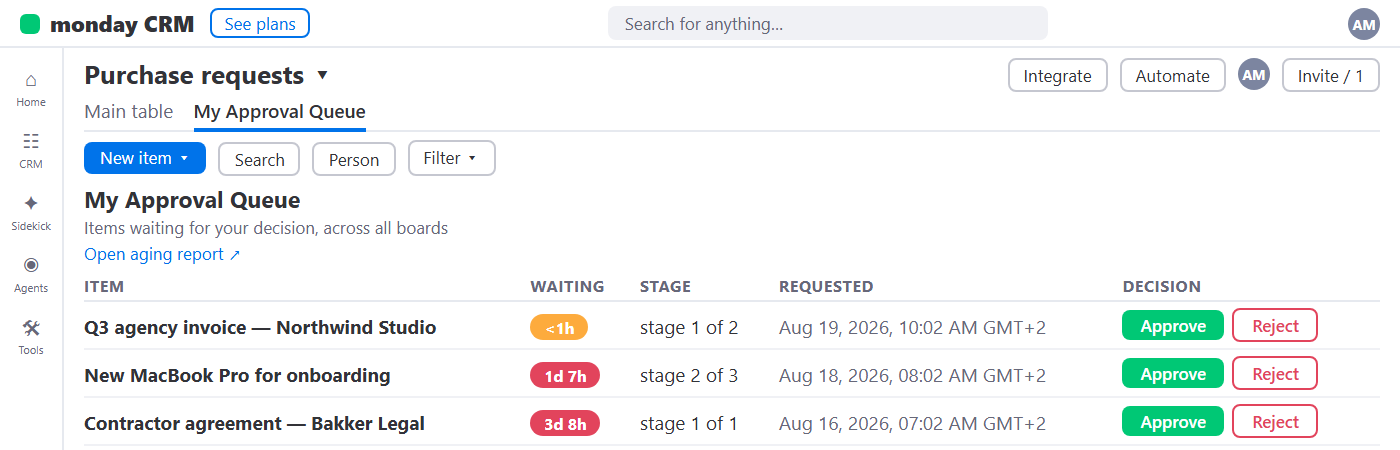
One place for everything waiting on you — across all boards in this account — each one a click away from its decision page.
- On any board, click + next to the board's views → Apps → Installed → My Approval Queue.
- New account? The Get started with Greenlight Approval Flow checklist sits above the queue until you hide it (§1).
- The table lists pending items assigned to you, with waiting-time badges, the current stage, and when the request went out.
- Hit Review in the row's Decision column. It opens the decision page in a new tab with the full request — approve or reject there.
- Click the item name to open it in monday, or Open aging report ↗ to see every pending approval in the account (§15).
- The Rules tab next to the queue is the routing-rules builder (§8).
12 · Approver templates
A template is a named, ordered set of approvers — “Finance → CFO”. Save it once and reuse it: pick it in the request dialog, or point a routing rule at it. The automation has no template picker of its own, but routing rules do apply to automation requests — when a rule matches (enforced or advisory), the request goes to that rule's template instead of the Approver column (§8).
- Create one on the Rules screen (§8): the Approval chains card at the top has a New chain button, with Edit and Delete on each chain. Account admins only, same as rules. The API works too:
POST /api/templateswith a name and an ordered list of approvers. - It then appears in the request dialog's Approval template picker and in every rule's Route to dropdown.
- Stage order in the template is the approval order.
13 · Reminders & escalation
Approvals that go quiet get a nudge — automatically. Nobody has to remember to chase.
| Behaviour | Default | What it does |
|---|---|---|
| Reminder | after 24h idle | Re-sends the decision email to the current approver, with fresh links |
| Escalation | not available | There is no escalation setting for your account today — stalled approvals get the 24h reminders above, and you can chase with Remind now |
| Sweep interval | every 15 min | How often pending chains are checked |
| Remind now cooldown | 10 min per chain | Shared with the automatic sweep, so manual and automatic nudges can't stack |
The idle clock is reset by every decision, so an active chain is never chased.
Need to chase someone now? The aging dashboard has a Remind now button on every row (§15). Press it twice inside the cooldown and the second press is refused rather than sending a second email.
14 · Row lock after approval
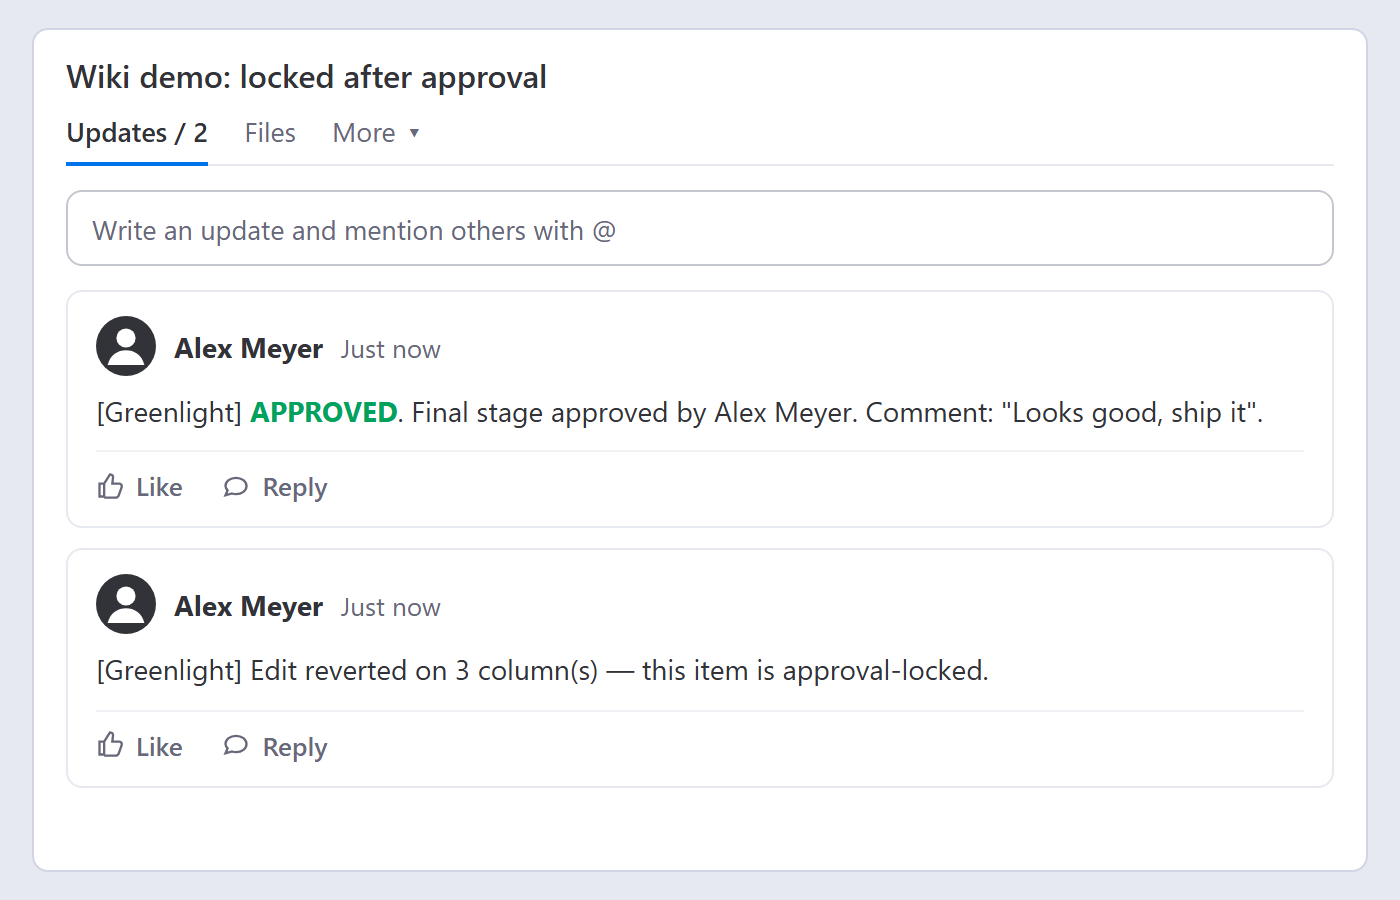
Once an item is approved, it shouldn't silently change. Greenlight snapshots the item at approval and reverts later edits automatically. Nothing to set up.
- At final approval, the item's column values are snapshotted.
- Any later column edit is reverted to the approved value within seconds.
- An update on the item says what was reverted: “This item was approved, so changes are reverted … Request a new approval to change it.”
- Need to change it for real? Send a new request: it lifts the lock, and the Request dialog lets you change the amount as you send it. While that request waits, only the values sent with it stay frozen (§3). To change one of those, cancel the request — the lock stays off, the old approval doesn't lock the item again — edit, then send a new one. The next approval snapshots the new values.
15 · Approval aging dashboard
Every pending approval in your account on one screen, bucketed by how long it's been waiting — chase the red ones first.
Open it from the Open aging report ↗ link at the top of My Approval Queue (§11).
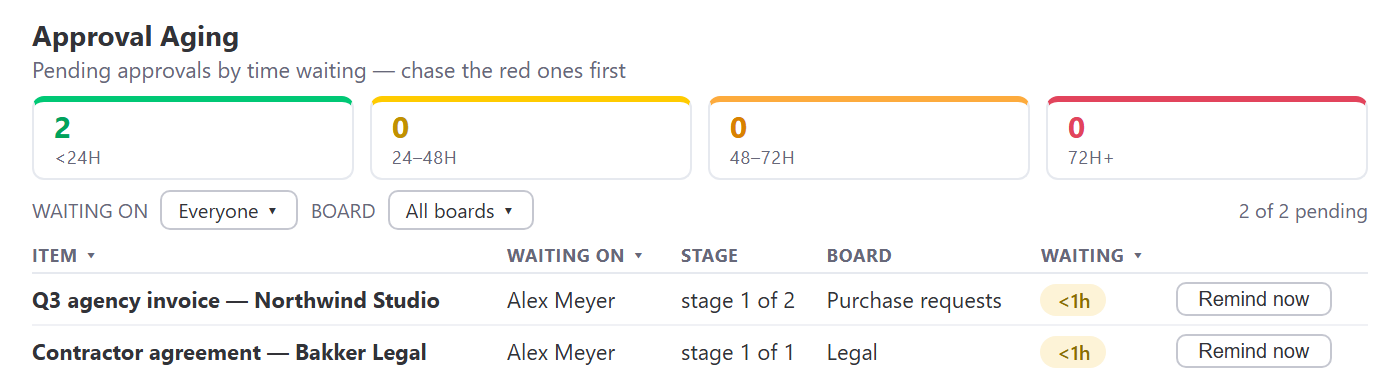
- Bucket counters — four cards counting <24h, 24–48h, 48–72h and 72h+, coloured green → yellow → amber → red so the backlog's shape is obvious at a glance.
- Filters — narrow by waiting on (approver) and by board. The row counter shows “N of M pending”.
- Sortable columns — click Item, Waiting on or Waiting to sort; clicking the active column flips the direction. Longest-waiting first is the default.
- Clickable items — each item name links straight to that item on its monday board.
- Remind now — one button per row re-sends the decision email to whoever the chain is blocked on, right now.
16 · The audit trail & what gets written back
Every request, decision, comment and lock action is written to the item's own update feed — in monday, not in a third-party database you can't see.
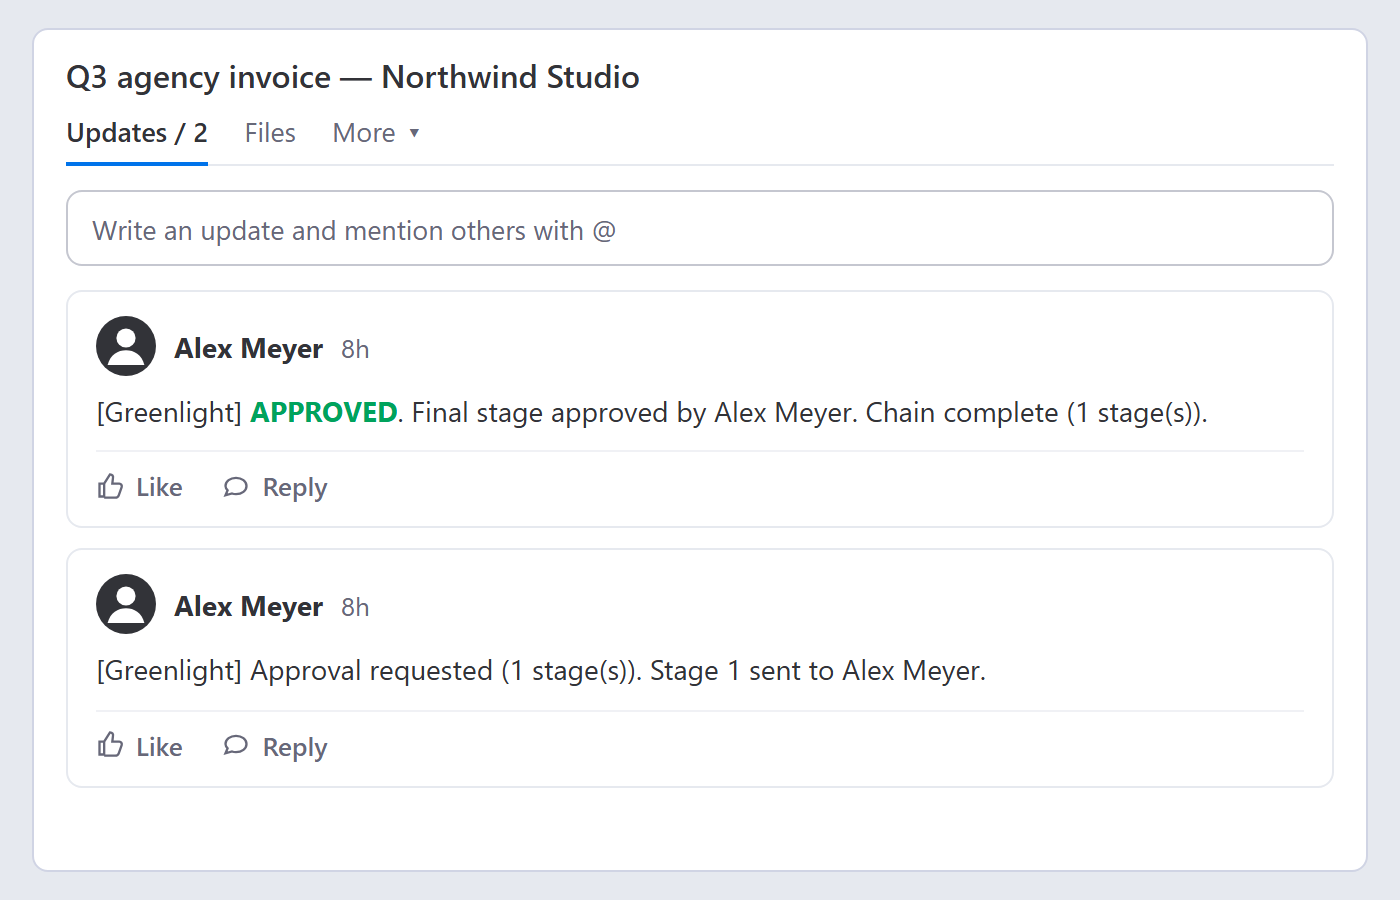
Entries are prefixed [Greenlight] and read like a log:
- “Approval requested (2 stage(s)). Stage 1 sent to Ada Lovelace. Routed by enforced rule ‘Purchases over 5,000’ (account) → template ‘Finance → CFO’. Message: …”
- “Stage 1 approved by Ada Lovelace. Comment: ‘Fine by me.’ Stage 2 sent to Grace Hopper.”
- “REJECTED at stage 1 by Jane. Comment: ‘Budget too high for Q3’”
- “APPROVED. Final stage approved by Grace Hopper. Chain complete (2 stage(s)).”
- “Request cancelled by Ada Lovelace. Reason: ‘Wrong amount on the invoice’”
Columns: what gets written, and when
| Started from | Audit update | Approval / Approved By / Approved At columns |
|---|---|---|
| The automation (§2) | Yes | Yes |
| The Request button (§3) | Yes | Yes |
17 · Plans & limits
Volume is the only thing that differs between plans. Every feature in this guide is on every plan, including Free — the AI brief and plain-English rule drafting included. The Free plan caps AI calls at 30 per month; Pro allows 1,000 per month (up to 50 of them rule drafts).
| Plan | Approvals per month | Boards |
|---|---|---|
| Free | 15 | 1 |
| Pro — $29/mo billed yearly, $35/mo monthly | Unlimited | Unlimited |
The counter resets on the first of each month. If you hit it, the request dialog tells you before you type — you'll see “Monthly approval limit reached” or, on Free, “Another board is using this month's free allowance”. Approvals already in flight are never interrupted by a cap. A cancelled request still counts — it was sent.
Other limits worth knowing
| Thing | Limit |
|---|---|
| Message length | 2,000 characters |
| Attachment | 1 file, 10 MB |
| Context columns sent to the approver | 8, chosen automatically |
| Typed approver emails per request | 5 |
| Decision links | expire after 7 days, single-use |
| Attachment links | expire after 7 days; can be opened more than once |
| Rules per scope | 100 |
| Conditions per rule | 10 |
| Comment on a decision | 4,000 characters |
| Reason when cancelling a request | 4,000 characters |
| AI calls (briefs & rule drafts) | 30 per month on Free; 1,000 on Pro (max 50 rule drafts) |
See pricing for the full comparison.
Still stuck?
Check the Q&A or send us a message via the contact form — a human answers.